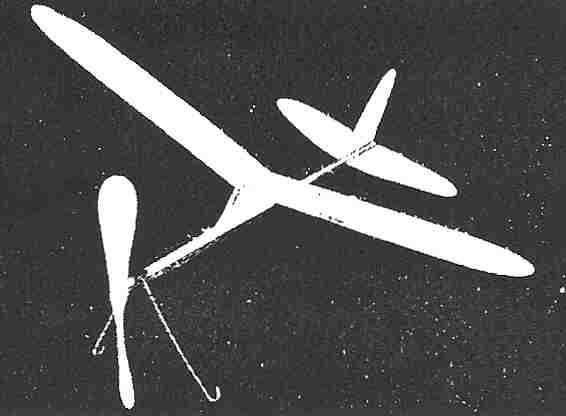
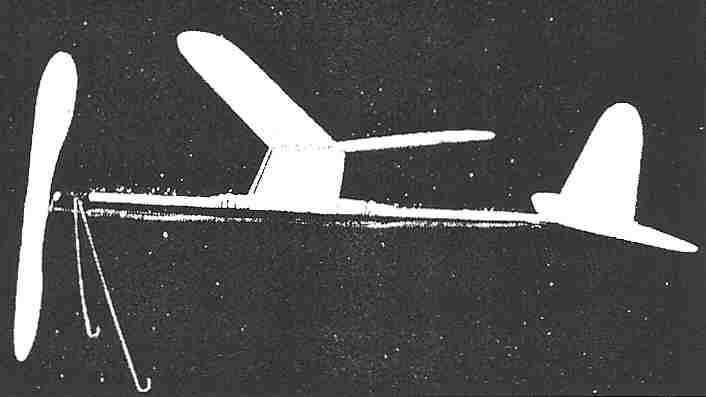
Fundamentals of Model Airplane Building A Complete Course for Beginners Who Wish to Become Expert. How to Build Your First Powered Model -Part No. 4 By EDWIN T. HAMILTON HERE it is! The first power-driven model airplane to appear in this course. When its designer and builder handed me this model, I instantly recognized it as another accomplishment added to an already long list of successes on the part of a man whose name stands above all others in the field of scientific model airplane designing. Its creation is the result of a year of experimentation with this particular type of plane. It will prove ideally suited for the novice learning the technique of model airplane building and flying. Following the progressive method of presentation, many of its features will be found similar in design to the corresponding features of the three gliders already presented in this course. Its elevator and rudder follow closely the general lines of those parts of the glider appearing in the July issue. Its wing is similar in form to the glider wing given in the June issue, while the raised position of the wing above the motor stick, as well as the motor stick itself, copy similar features found in our first glider presented in the May issue. So here is a splendid power-driven flying model which might be called a glorified glider, because its various parts as well as its general assembly, have been literally borrowed from the three gliders. already presented. Test flights proved its stability so remarkable as to bring comment from spectators who knew nothing of model airplane flying. When wound fully with a winder, it is capable of flying for seventy to seventy-five seconds and covering in this time a distance of from one thousand to twelve hundred feet. When the winding is done by hand, it will easily travel for thirty-five seconds and cover a distance of six hundred feet. Let's get busy and build this modern, up-to-the-minute model. Then we’ll find a large open field, wind its motor, launch it and watch our first power-driven plane sail away on its maiden voyage! Motor Stick Read all instructions and carefully study the accompanying plan before starting work. Under "Top View" will be seen the line "Motor Stick 3/16" x 1/4" Hard Balsa." Just under this is the dimension line of the stick showing its length to be 17". As the stick must be sandpapered smooth, one should be purchased at least 1/4" thick, 5/16" wide and 17-1/4" long. Lightly sandpaper the stick down to exact size. In the "Side View" will be seen the form of the stick. Its front end is rounded on the upper side while at a point 4" from its rear end, the stick tapers from its original width of 1/4" to 1/16" at the end. Cut these after laying them out in pencil. Complete the cuts by sandpapering them smooth. This completes the stick except for its wire fittings, which will be discussed under "Wire Fittings." Elevator The elevator is cut to form from a piece of balsa wood measuring 1/32" thick, 2-1/2" wide and 8" long. Note its form shown at the bottom of the plan in graph. Make a full-size pattern of the elevator. (See June issue, Page 8). The plan is shown on 1/4" squares so your paper must be ruled with 1/4" inch squares. Place the pattern on your sheet balsa so that the straight, trailing edge of the elevator is running parallel with the grain of the wood, and make the tracing in the usual manner. The elevator is now cut out and then finished by carefully and lightly sandpapering both sides and rounding its edges. Rudder A full-size pattern of the rudder is copied from the graph plan in the usual manner. This is traced on a piece of sheet balsa measuring 1/32" thick. 2-1/2" wide and 3-1/2" long. The straight, trailing edge of the rudder must be parallel with the grain of the wood. The rudder is then cut out and finished with sandpaper in the same manner as the elevator. Tail Skid This consists of a tapering block of balsa wood, as shown under the elevator in the "Side View" of the plans. It requires a piece 3/16" thick, 1/4" wide and 3/8" long. Its under side is tapered from its original width of 1/4" to a medium sharp edge, as shown in the plan. Wing Before making the wing, it will be well to carefully study the instructions given for the wing in the June issue on Pages 9 and 36. Obtain a piece of sheet balsa (soft), measuring 1/8" thick, 2-1/4" wide and 20-1/2" long. Note the pan of the wing shown under "Wing". Its finished size must be 2" wide and 20" long. Square it up and cut to this exact size. Its ends are now finished, as shown in the graph plan under "Wing Tip." Make a full-size copy of this tip, trace it on each end and cut to proper shape. Complete the tips by sandpapering their cut edges smooth. In the plans under "Wing Assembly" will be seen the shape of the wing, which must now be given it with the aid of sandpaper. Follow the instructions for this work given in, the June issue on Pages 9 and 36. When completed, the wing is given its dihedral angle. Note this in the plans under "Wing." Each tip is given a 2" dihedral. (See June issue, Page 36 Fig. 3). The wing mounting is now made. This is shown under "Wing Assembly." It consists of two sides, a mounting stick and a separator. The sides are made first. Both may be cut from a single piece of sheet balsa measuring 1/32" thick, 2-1/2" wide and 4" long. Their grain must run up and down when assembled under the wing, as shown in the plan. As the wing is set with its leading edge 3/32" higher than its trailing edge, these pieces forming the wing mount must be 3/32" longer, or higher, at the front than at the back. Note that their top width is only 2" while they are 2-1/2" along the bottom. Cut one of these side pieces perfectly and then make a second duplicate piece. Test them by placing one on top of the other and seeing if all sides of both match perfectly. A 3/16" square balsa stick is cut 5" long, as shown in the plans. Both of its ends are tapered along the top from its original thickness of 3/16" to 1/16". The front taper begins 1-1/8" back from the front end and the rear tapering begins l-3/8" back from the back end. A second stick is cut of the same size balsa stick, but is only 2" long. This is used to separate the side pieces at the top and is shown in dotted lines, Its ends are beveled, as shown. The entire mounting is now assembled. Cement the long balsa stick between the side pieces with its bottom edge parallel with the bottom edges of the sides. Note that it extends out 1-1/8" at the front of the side pieces and 1-3/8" at the rear, and that it is located 1/4" above the bottom edges of the sides. The short stick is cemented between the sides along their top edges, so that the top edge of the stick and those of the sides are flush. The wing is mounted on this assembly, as shown in the plans under "Wing" and "Wing Assembly." The top of the sides and their separating stick must be slightly grooved to fit the slant of the wing's center joint. (See June issue, Page 10, under "Wing"). Cement the wing in place so that its center joint comes in the exact center of the sides of the elevation assembly, as shown by the front view of the "Wing." See that both wing tips are exactly the same height above the center assembly. Metal Fittings
All power-driven model airplanes require a certain number of metal fittings. Most of these are bent from wire. While the majority of model supply houses carry a full line of "standard" shapes in metal fittings, every builder should learn how to bend his own from straight wire so as not to be dependent on the manufactured article, As weight is one of the most important factors in model work, a very thin wire must be used to keep it at a minimum. At the same time, it must possess the required strength. Piano wire has been found to produce the greatest strength with the least weight and is universally used by model builders. It may be purchased at any model supply store. The size or diameter of wire is measured with a wire gauge. Each diameter is specified by a number and when ordering wire, the purchaser should not only order "piano wire" but must name the desired number. As it is well for the beginner to know something of wire diameters and their numbers, a few of the most commonly used are given here:
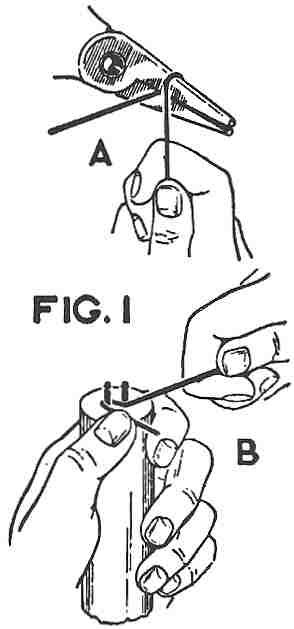
While only about 6" of wire is necessary for this model, surplus wire of various sizes should be kept on hand. The fittings of this model are bent from No. 14 piano wire. Bending wire requires time and practice, Do not feel discouraged if your first attempts should fail because when once mastered, any fittings may be made with ease. Special wire cutters should be purchased, as piano wire will ruin an ordinary pair of pliers in a short time. Round-nosed pliers should be used for bending this wire, and two pairs will be found useful. While one holds the end of the wire, the second can do the bend in. Note Fig. 1-"A." This shows the usual method of bending wire. The pliers hold the wire while the other hand or a second pair of pliers brings the wire over for the bend, Small circles can be made in this manner. A simple wire bender is shown in Fig. 1-"B." It consists of a short length of I" dowel, or a piece of broomhandle, into the end of which two small brads have been driven. The heads of the brads tend to keep the wire in place during bending. Handles may be 6" or 8" long and several such benders may be made with nails of varying diameters for bends of different sizes. We will need a propeller bearing, propeller shaft, landing skids, two wing clips and an end hook for this model. While the making of propeller bearings will be given at a later date, the one for this model should be purchased, but all other fittings are made. At the top of the plan will be seen how the end hook, wing clips and propeller shaft are bent. Make the under bend in the end hook as shown, thrust it through the center of the motor stick 3" from its trailing end, or 1/2" in front of the elevator location, and then bend over the protruding end. A drop of cement on this end will hold it in place. Note this in the plans under "Side View" Just in front of the rudder. Bend two wing clips, as shown in the plan, but do not assemble them in place on the stick at this time, The propeller shaft is bent after the propeller has been carved, but the landing gear skid is made now. Note how this is formed in the plans under "Side View" and "Top View." The bend of the skid fits around the end of the motor stick and its ends then slant out and back, as shown. Cement this and the purchased propeller bearing in place. The latter fits on the under side of the stick at its front end. When both fittings have been cemented in place, reinforce them by wrapping silk thread around the stick and the fittings. When the wrapping has been completed, a coat of cement will add strength and cement the thread in place. Propeller
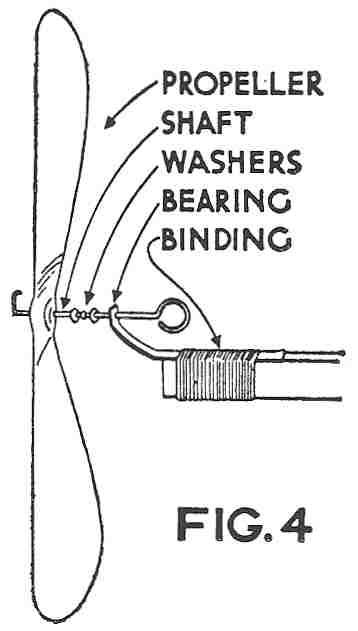
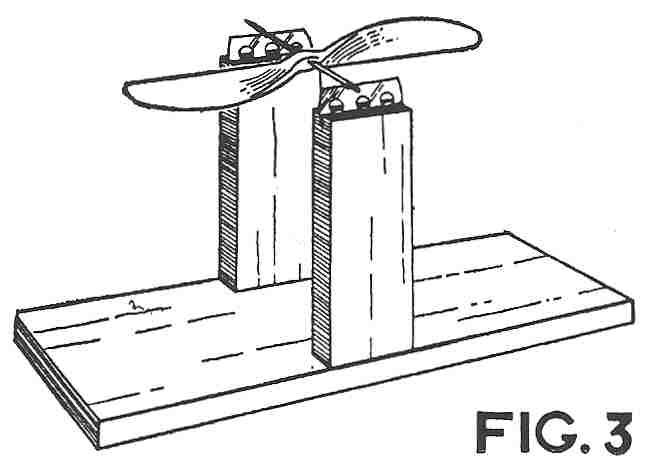
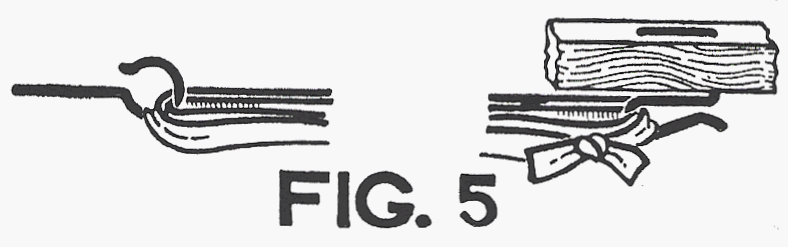
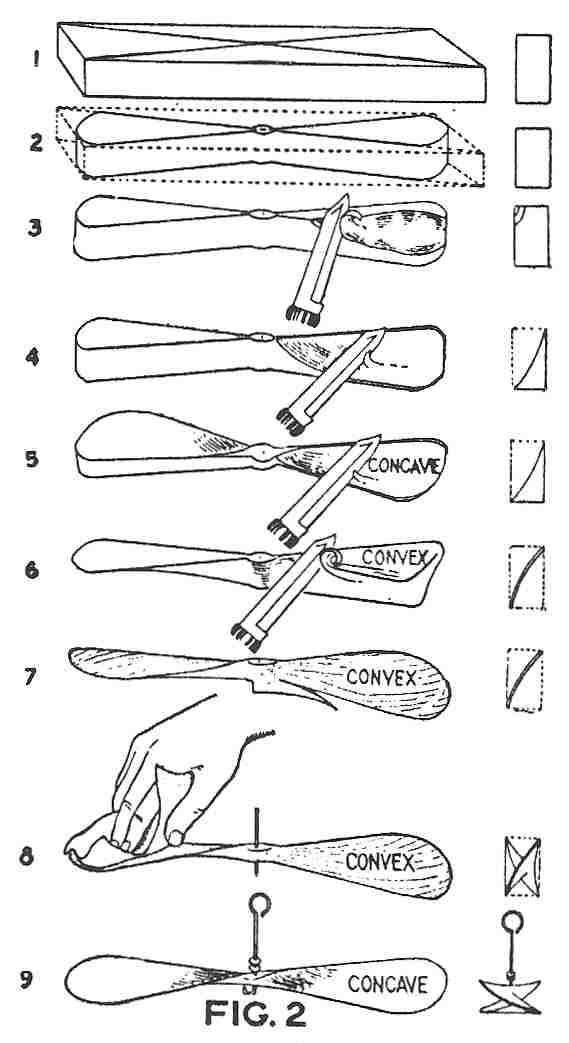
The propeller for this model is carved from a block of hard balsa wood measuring 3/4" thick, 1-1/4" wide and 8" long. As propeller carving is a step requiring considerable practice, several such blocks should be purchased by the beginner, so as to allow for mistakes and the spoiling of propellers in the process of carving. Diagonal lines are now drawn across the face of the block, as shown in Fig, 2, Step 1. The general shape of the propeller is drawn on this same face with these diagonal lines acting as edge guides, as shown in Step 2. Step 3 shows the first cutting operation. A sharp pocket knife may be used for this work but a regulation propeller knife will he found best. Such a knife is shown in the illustration and can be purchased at any model supply house. In this first cutting step, the blade attacks the right top edge with a scooping motion to give the cuts a concave form. At Step 4, we see the same operation near the finish, as the knife removes the wood in a concave form which slants from the rear top edge to the front bottom edge. Note the end views of each operation at the right of the illustration. The blank is now swung around and the knife makes a duplicate concave cut on the other, side, or the original left side of the blank, as shown in Step 5. All cutting must be done from the hub (center) of the propeller toward the tips to eliminate false cuts or possible splitting, The hub is left its original thickness while the carving is being done. At this point both concave cuts have been made, and when the blank is viewed from on top of the hub, both these cut sides must appear on the side of the blank, while the untouched sides will not be seen or will appear on the opposite side. The blank is now turned over and the convex sides are cut. The start of the first cut is shown in Step 6. These cuts must run parallel with the concave cuts on the opposite side and should be continued until the blade is 1/8" thick, gradually increasing toward the hub. Both sides are cut in the same manner. Following the carving of the blades, the hub of the propeller should be cut away, as this is its most inefficient part. While experts cut their hubs down to 1/8" thickness, the beginner should leave his not less than 1/4". Step 7 shows this being done. As the shaft of a tractor propeller, such as this one, extends out from the concave side of the blades, it therefore follows that the excess hub material is cut away from that side. Round the blade tips as shown. Step 8 shows the final sandpapering of the blades. This is an important step. The propeller is now tested for proper balance. To insure even rotation of a propeller, the blades must be exactly the same weight. As it is obviously impossible to weigh each blade, the balance method is used. A simple balancing block is shown In Fig. 3. It consists of a platform with two uprights of the same length. Into the ends of each a razor blade has been inserted. Piano wire of the same diameter as the intended shaft is thrust through the center of the hub. Make sure that this hole is directly on the cross marks of the two diagonal lines, and that it is inserted perfectly straight. Remove the wire and insert in its place a needle of smaller diameter, so that the propeller will turn easily on it. File small notches in the exposed edges of the razor blades and then place the protruding ends of the needle in these notches. The propeller should now rotate easily on the needle when blown on, If both blades are of equal weight, the propeller will stay at whatever angle it is stopped in. If not, the heavier of the two will drop down. This blade must then be sandpapered until both are equal. Step 9 shows the final assembly of the propeller. Bend your propeller shaft, as shown in the plans at the top under "Propeller Shaft." The end opposite the hook is thrust through the hub so that the hook is on the concave side of the blades. Bend the straight end of the shaft around, as shown, and carefully pull it back until the point of the shaft buries itself in the wood of the hub, where a drop of cement will hold it in place. Assembly Center the elevator on the under side of the motor stick and cement it in place, as shown in the plans under "Top View," See that the trailing edge of it is at right angles to the stick. The tail skid is now cemented to the under side of the elevator, directly under the motor stick and flush with the trailing edge of the elevator, as shown. The rudder Is cemented to the right side of the motor stick when sighting it from the rear. Its bottom edge rests on the top of the elevator and its leading and trailing edges are flush with those of the elevator. Apply a fiber washer to the propeller shaft, and thrust its hook through the hole of the propeller bearing. Steel washers may be used, but the fiber is recommended. The final assembly of a propeller is shown in Fig. 4. While this shows the motor on top of the stick, and ours is on the bottom, as shown in the plans under "Side View," the assembly in both cases is the same. Motor Power Our "motor" consists of a high grade of rubber strand which, when unwinding, turns the propeller, We will need about 51" of 1/8" x 1/30" pure Para rubber, which can be purchased at any model supply store. Loop the rubber length and tie its ends together in a square knot, as shown in Fig. 5. Loop this into four strands and place one end of double loops over the hook of the propeller shaft. The opposite end loops are fastened or looped over the end hook, as shown in Fig. 5. A slight "play" will be found in the rubber, which is allowed for surplus winding. The wing is now assembled on the top of the motor stick. The mounting stick is placed on top of the motor stick with the two sides of the mounting assembly fitting over the sides of the stick. The two wing clips are now placed around the under side of the stick, so that their small hooks come above the top of the stick. They are placed in front and back of the mounting stick, as shown in the side view of the plans. Two small rubber bands are used to hold the mounting stick in place on the motor stick. Loop them between the hooks of the clips until tight. In the plans under "Wing" is shown the proper center of gravity point by the letters "C.G." The wing with its mounting and clips must he moved forward or backward along the stick until the model balances evenly on this point. This completes the model. Flying The usual right-hand propeller, such as this model is equipped with, turns counterclockwise when viewed from in front, and must be wound therefore in the opposite direction or clockwise. Hold the model in your left hand so that the propeller is facing you and with your right hand wind the propeller clockwise. Give it about two hundred turns to start with. Holding the propeller with the left hand to prevent it from turning, place the right fingers around the stick just below the wing. Place it above your head, level with the ground and release it with a slight push dropping both hands away at the same time. Scanned from August 1934
|