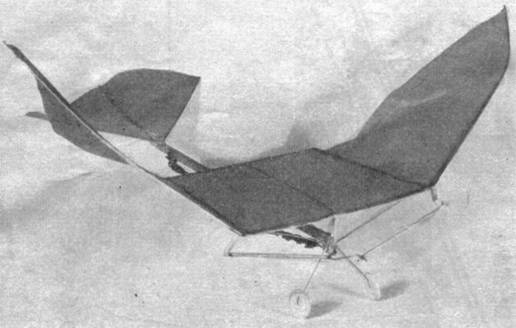
The finished model that flies by flapping its wings
The Plan Page
[ Home ] [ Previous Plan Pages ]
[ Special Things ] [ Earl Stahl Plans ]
gt-hunter1@home.com
Build a Wing Flapper That Flies
How You Can Make and Fly an
Ornithopter Model
Successfully That Has Soared for Nearly
One and One-Half Minutes
By SALEM BARRACK
The
finished model that flies by flapping its wings
WING flappers, technically known as ornithopters. were the first type of aircraft to be experimented with. Penaud, one of the pioneers of aviation, is said to have carried on extensive research and tests in this line. He was, as history has it, partly successful with model ornithopters but did not succeed with a man-carrying size. Ornithopter method of flight was given up for the conventional propeller and rigid wing type. After this type had proved successful, little heed was given to man-carrying ornithopters but experiments were still carried on in model form. Some had little success but others failed in making their scale model birds fly.
Those who were at the 1933 National Championship Meet (Outdoors) will remember seeing a wing flapper which could only execute one loop (by mere force of power) and then would try to burrow in the ground. Several weeks later a similar model was seen at the New York City Model Airplane Derby which performed a little better. This model could make two loops and flutter down. There are several boys in the U.S. who claim to have had success with such a model as a wing flapper but have not openly proved so.
It was in the latter part of 1930 that I first began to study and experiment with model ornithopters. Like the others who had failed, I was about ready to give up. However, carrying on my experiments intermittently for three years I finally succeeded in obtaining level flight. Those who were at the 1932 Eastern States Indoor Meet held in New York City will remember a wing flapper which when launched of the balcony would make a level flight and then glide down gracefully. Diligently keeping up my work in this line until a year later, I then had a wing flapper which was capable of making a climbing circling flight and their gliding to earth in a birdlike manner. I had actually made a wing flapper that gained lift and forward speed from the same wing. I redoubled my efforts until a year later a model wing flapper was produced which could not only climb and glide well but also soar on an ordinary hot day. This model has made a soaring flight of 1 min., 29 sec.
Now would you like to build the little model wing flapper that even attracted the close attention of your editor, Mr. C. H. Grant? I suppose you would, so here it is. Read the instructions thoroughly and be sure you understand the plans completely before you begin construction. One thing more - don't try to insert anything new in the wing flapper unless you build it completely from the plans first.
Wire Fittings
Great care has to be taken in making the wire fittings, as the success of the model depends on them. The "yoke brace" is made from .034 piano wire. The two eyelets that are bent in it should be able to tightly fit 1/16" diam. bushings. The two wing braces are also made of .034 piano wire. Be sure to make one right and the other left. Great care should be taken in bending the crankshaft. Make sure that every bend in the crankshaft is as sharp as possible and that your crankshaft is as accurate as the one in the drawing. You may have to make several of them before you make one that is like the one in the drawing.
Attachment of Mechanism
Great care has to be taken in assembling the mechanism of the wing flapper. First make the wing yoke from 1/16" hard balsa and mark off the place of the "yoke brace." Using plenty of cement, cement the "yoke brace" to the wing yoke and let it dry while making the connecting rods. The connecting rods are made of 1/8" diam. dowels 1‑7/8" long or can be made of ordinary matches 1-7/8" long. Little holes are burned in the ends of these by means of red hot pins heated over a candle flame. These holes are to be big enough to easily fit the crankshaft. Slip the connecting rods on the crankshaft. Now on the crankshaft, slip on in the order named, one 1/16" bushing, one 1/4"washer, two 1/8" washers, and one 1/16" bushing. Now fit the crankshaft on the "yoke brace" and bend the hook to receive the rubber. With the crankshaft on the "yoke brace," cement the "yoke brace" to the 1/4" square motor stick. Bind with thread and cement again. Put this aside to dry while you hunt for a good smooth piece of bamboo that hasn't any knots in it and has plenty of flexibility.
Wing and Tail
Start making the wing by slicing off the above mentioned bamboo, two pieces 1/16" square. Gradually taper one piece at a time until they are 1/32" square at the tips. Bind well with thread and cement. Let dry for a few minutes. Make the wing ribs from 1/16" flat hard balsa. There are two of them and they are tapered from 1/16" by 1/4" to 1/16" by 1/16". Assemble the wing spars to the wing yoke by means of bearings made from thin cardboard, preferably cut from a penny post card. Bind well with thread and cement.
After the wing spars are attached, cement the wing ribs in the manner and position as shown on the drawing. Allow this to dry while cutting the bamboo for the tail. Out of the same piece of bamboo that the wing spars were cut from, cut three pieces of bamboo tapered front 1/16" square to 1/32" square to conform with drawings. Lay these on the side and proceed to make a pattern or template for the wing covering. After the template is made, cement the three pieces of bamboo for the tail on the end of the motor stick as shown on the drawings.
Using the pattern, cut a whole piece of paper for the wing covering with the grain running as shown on the drawing. A paper is left for the trailing edge in order to gain the proper sag and slack. Use cement in attaching the paper to the wing frame. Next cover the tail. Use red Japanese tissue in both cases. The wing is connected to the mechanism by attaching the free ends of the connecting rods to the wing braces and bending up the wire to keep the connecting rods from slipping off.
Flying Instructions
The wing flapper will fly on four strands of 1/8" by 1/30" brown rubber or six strands of 3/32" by 1/32" black rubber. It can be wound up either to the right or to the left. In such a model as the wing flapper, one does not have to worry about torque or carving propellers. The model does not have a rudder but turns by bending or tilting the tail to the right or to the left. Adjusting the model as to stalling or diving is made by shifting weight or sticking pins in the nose. In order to wind up the model with a winder, an S-hook is put on the end of the rubber in the conventional manner
|
Notes and Hints on the Flapper |
|
|
1. |
Don't expect your first model of the wing flapper to fly perfectly. You may have to build two or three of them before you get a real nice flying model |
|
2. |
If your model does not fly on the designated power, do not try to add more, try to lighten your model instead. (Mine flew on two strands of 5/32" brown rubber.) |
|
3. |
Paper on the wing should be changed about every 500 or 600 flights, as the paper becomes too loose. |
|
4. |
Best flights are obtained by having a slight negative angle of incidence and the proper weight in the nose. |
|
5. |
It is not advisable to build a larger size than the one shown in the plans. |
|
6. |
Don't by any means think that by scaling this wing flapper smaller or larger it will go better because it will not. (I have already tried it.) |
|
7. |
It will take time to get used to flying the wing flapper. It can be easily launched with one hand. |
Well, there you are! Now let's see you build and fly some scale model pigeons.
Scanned From October, 1935
Model Airplane News
![]()
![]()
[ Home ] [ Previous Plan Pages ] [ Special
Things ] [ Earl Stahl Plans ]