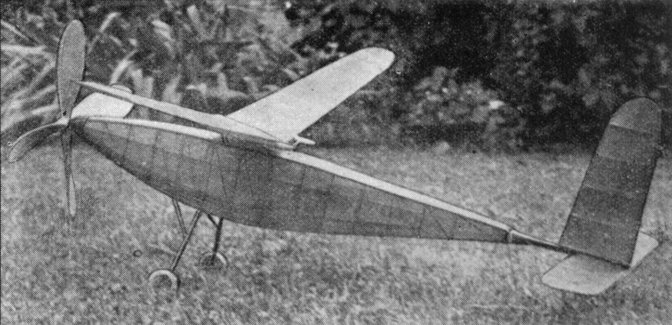
The completed model with its unique but efficient propeller.
The Plan Page
[ Home ] [ Previous Plan Pages ]
[ Special Things ] [ Earl Stahl Plans ]
gt-hunter1@home.com
"Tubby"
A High
Performance "Wakefield" Contest Model of
New N.A.A. Specifications That Is Easy to
Build From These Plans
By DONALD MERTENS
The
completed model with its unique but efficient propeller.
"TUBBY," as I have nicknamed this model, due to its unusual appearance, is a high performance contest model meeting all of the newest N.A.A. specifications. It is a direct development of a model sent to England to compete in the 1935 Wakefield International Contest. Unfortunately the model was smashed before it could make any official flights and was not repaired in time to compete.
Tubby was designed to present a high performance model for the novice, that has performance equal to the best. It was with this thought in mind that this article was written. If the plans are followed closely you will have a model that will consistently place you among the winners of any contest that you enter.
Now we shall get on with the construction of the model. First you will want a set of full size drawings from which to make the wing and other components. A word about the plans. I believe that you will find every little item shown in a precise self-explanatory manner, so instructions will be kept to a minimum.
Fuselage
Lay the 1/8 sq. stringers in place on the side view. Put the uprights and diagonal members in place, glue securely. It is best to make both sides of the fuselage at the same time so that they will be exactly alike. Start joining the two fuselage sides at the tail and work forward. After all the cross braces are in place, glue the diagonal truss members in place. Now attach the stringers to the main structure. When dry fill in the nose and tail sections with sheet stock as shown on the plans. Now glue the 1/16" dia. alum. tube for the landing gear in place on the fuselage; also add the hooks for fastening the nose and tail plug. Carve the nose and tail plugs from the size blocks given on the plan; the tail plug also incorporates the tail boom, which is installed as shown. Now sand the fuselage lightly and cover. A word about the covering, this should be done in small sections joining each section neatly. Now dope the fuselage with three coats of the dope given under the heading "doping." Attach the wing mounts as shown.
Wing and Wing Ribs
The type of rib used on this model fabricate together to form a stronger rib than the solid type and also saves weight. A full size rib is shown. Cut the upper and lower curves from 1/16" sheet. Make all the ribs the same; in order to obtain the right length rib for the tip and intermediate ribs, cut the extra amount from the trailing edge. This method of making ribs simplifies the construction of tapered wings.
Place the leading and trailing edges in place on a full size drawing, then glue the bottoms of the ribs in place. Glue the spars in their correct places. When these are dry, glue the tops of the ribs in place. Bend to shape and glue the bamboo tip in place. Now cover the sections shown with 1/64" sheet stock. Sand the completed wing and put away for covering later.
Tail Surfaces
Cut out the rudder ribs in the same manner as the wing ribs. The construction is the same as the wing.
The elevator is made in the same manner as conventional ones are.
Sand the tail surfaces lightly and lay aside for covering.
Covering
Start by covering the rudder; this should be covered in four pieces. One piece is used from the bottom rib to the tip rib and another piece for the tip.
The elevator is covered in the same manner as the rudder.
Cover the wing by starting at the center rib and using one piece to the tip rib and then a separate piece for the tip; do the same for the other side. The top and underside should be covered separately. The grain of the tissue should always run the long way of the structure to be covered.
Doping
A dope consisting of two parts of collodion to one part of acetone, mixed completely together, should be used. Give all parts two coats of this dope. The wooden parts should be given two coats of straight collodion over the dope. (Note: all wood parts should be doped after the assembly of the complete model.)
Landing Gear
Bend all the wire parts for the gear as shown. Put the wires through the alum-tubes on the fuselage. Cut the struts to size and shape. Glue the struts in place on the wires that are through the tubes on the fuselage. Glue the spreader wire in place on the rear struts and fit "A" onto the front struts. Put the axles on the rear struts, and give all the joints a second coat of glue. Slip the wheels onto the axles and then solder a washer in place on the end of the axle to keep the wheel from slipping off. Assemble the gear together as shown on detail 2; a 1/2" long rubber band is used for the shock absorber. The rear struts should slide backwards in the guides and then be pulled forward in place by the rubber bands. Each side of the gear works semi-independently of the other.
Assembly
Glue the rudder and elevator onto the tail boom; a bamboo brace is run from the boom to the third rib on the rudder. Similar braces are placed on each side of the elevator.
Carve two right hand propellers and join them as shown in detail 3.
Bend all wire parts not yet made and install in their respective places.
Fasten the wing onto the wing mounts with rubber bands as shown in detail 4.
Power
Twenty strands of 1/8" x 1/30" brown rubber 36" long should be used. Put an "S" hook on each end of the motor. Make sure that you have rubber tubing on these hooks to prevent the hook from cutting through the motor. The nose and tail plugs are held in place when the motor is slack by the hooks that are provided for that purpose, and not by the rubber motor.
Flying the Model
Put the motor in the fuselage and install the nose plug with the propeller on it, and the tail plug in place.
Give the model a trial glide where the grass is quite high; if it dives move the wing forward and if it stalls the wing should be moved aft. When the model has a steady glide, wind up the motor to about 100 turns for the test flight. Minor adjustments will have to be made to the wing setting as you increase the number of winds put in the motor until the maximum power is reached. Turning of the model is controlled by warping the rudder and giving the wings "wash in" and "wash out" at the tips. The motor can be wound to approximately 1800 turns. With full power the model will take off in about 3 feet and the length of the flight is governed only by the thermals that it encounters. This model is very sensitive to the slightest air current and a slight thermal will send it scooting up, so get ready for a long chase.
Scanned From May, 1938
Model Airplane News
![]()
[ Home ] [ Previous Plan Pages ] [ Special
Things ] [ Earl Stahl Plans ]