 Intriguing details give a realistic appearance |
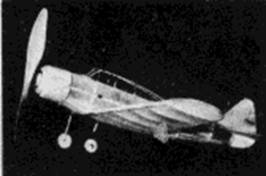 It has a comparatively large "prop" |
The Plan Page
[ Home ] [ Previous Plan Pages ]
[ Special Things ] [ Earl Stahl Plans ]
gt-hunter1@home.com
Intriguing details give a realistic appearance |
It has a comparatively large "prop" |
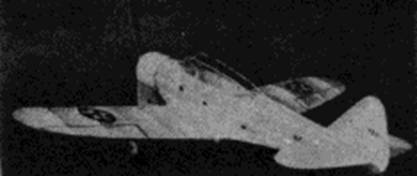
DOUGLAS TORPEDO BOMBER
By HERBRT K. WEISS
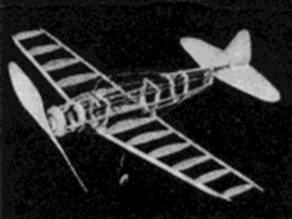 The framework is well designed |
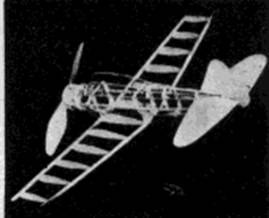 It is simple and easy to build |
ONE of the Navy's best torpedo planes was the Douglas TBD-1 flying under a double classification, the TBD-1 carries either bombs or a torpedo at an estimated top speed of 235 mph. Since the ship is used aboard carriers, space is an important factor, and the wings of the TBD-1 fold up and in on themselves from a chord about midway to the tip. The experimental version of the torpedo-bomber had a straight cockpit housing, but the accepted version has had the housing humped, probably to accommodate the directional loop of a radio antenna. The engine is a Twin Wasp of 850 horsepower.
Because of the comparatively small size of the model, there are certain points which must be stressed in construction:
Sand the fuzz off all balsa used in the model before using it; the frame will be lighter, cleaner and stronger. Use plenty of cement; the small additional weight is negligible against the gain in ruggedness and freedom from warping. Keep the tail of the model light: every weight you put on the nose for balance will mean just that much more weight that the ship has to carry, and it's a small ship! And remember, a little mistake on a small ship is equivalent to a pretty big one on a large model.
Wings and Tail
Make the wing first, as it's used as a jig for the fuselage. The frame can be assembled on the plan, if the left wing panel is traced on another sheet of paper and pinned down in its proper place. The wing is built in one piece. Put waxed paper over the plan, pin the leading and trailing edge in place, and add the ribs and wing tip.
Use plenty of cement. The bamboo for the wing tip can be bent over a flame, or, as it is very thin, it will bend easily without heating and can be tied in place with silk thread while the cement is drying.
When the frame is dry remove it from the waxed paper and with a razor blade cut loose surplus cement and any waxed paper which may have adhered. Crack the spars just outside rib 1 and give the wing 3/4" dihedral at each tip. Re‑cement the spars, and when the cement is dry shape the leading and trailing edge to airfoil shape with a razor and sandpaper.
Trace the tail surfaces on 1/32" sheet balsa and cut them out. The stabilizer is made in one piece. Sand the pieces smooth. Cement the 1/32" x 1/16" stiffeners on top of each side of the stabilizer.
Fuselage
Cut two halves of each bulkhead from 1/16" sheet. As the fuselage must stand handling do not substitute 1/32" sheet. Cement the halves together, using small lengths of 1/32" square bamboo across the grain to stiffen the assembled bulkhead crossways at the joint. Cement bulkheads C and D to the wing center section in the position shown on the plan. Now cement the 1/8" x 1/16" main side stringers to these bulkheads, and add the remaining bulkheads to the 1/8" x 1/16" stringers, being careful to keep the bulkheads lined up correctly. Complete the fuselage frame by adding the 1/32" square bamboo stringers, formers B and D, and the 1/16" square balsa top and bottom stringers. The tail post is 1/16" x 1/8" balsa.
Cowl sections are round, so that the diameter of the cowl formers can be taken from the plan and the sections drawn on sheet balsa with a dime compass. Cover the cowl with 1/32" sheet balsa, and sand the whole cowl after assembly until it is smooth. A small hardwood nose plug is used and can be obtained at any model counter.
The plan shows the correct number of cockpit formers; some may be omitted for simplicity. Make the formers from 1/32" square bamboo.
Assembly and Covering
Sand the fuselage and wing carefully so that there will be no projections to spoil the covering. Cover the model carefully with white tissue, using small strips on the curved parts of the fuselage. The landing gear is attached to the wing before covering, and the tissue is cut to fit. All wire parts are .028 wire.
Spray the model lightly with water, and when it is dry, sand off the fuzz which will appear at the leading and trailing edges of the wing and at sharp corners on the fuselage. Give the model one coat of clear dope which has been mixed with thinner in about a half to half ratio. Dope the cowl and other parts, but do not dope the tail surfaces. Sand any roughness which may appear, and then cement the tail surfaces in place. To insert the stabilizer, slit the tail post with a razor, push the stabilizer: into position and cement it, then recement the tail post.
Add as much detail as may be desired. The model has a standard navy insignia, including stars on top and bottom of each wing tip.
Propeller
Carve the propeller from hard balsa, using a block 4-3/4" x 7/8" x 1/2", or use any medium pitch prop of that size that you may have. Do not use a high pitch prop, for the torque will make the model difficult to control laterally.
Flying
The model should balance just about right if hardwood wheels are used. Test it by gliding it. If it stalls check the tail attachment, and if there is any perceptible negative incidence cut the stabilizer loose and readjust it to zero incidence. If the model still stalls, sand the tail surfaces. Add weight to the nose only as a last resort. If the model dives warp the elevators up slightly or use lighter wheels.
If the model spiral dives under power, warp the trailing edge of the inside wing down slightly.
Use two strands of 1/8" flat rubber, lubricated, with about a half inch of slack. For long flights after the model is adjusted, use a winder.
Scanned from
Flying Scale Models
Air Age Publications
Copyright 1944
![]()
[ Home ] [ Previous Plan Pages ] [ Special
Things ] [ Earl Stahl Plans ]