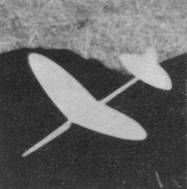
Champion Glider
Now you can duplicate
the model that set
the
official N. A. A. record for its size.
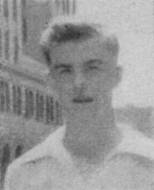
by Wallace Simmers
Class A and B
indoor glider record holder.
|
|
|
The Plan Page
[ Home ] [ Previous Plan Pages ]
[ Special Things ] [ Earl Stahl Plans ]
Champion Glider
Now you can duplicate
the model that set
the
official N. A. A. record for its size.
by Wallace Simmers
Class A and B
indoor glider record holder.
|
|
|
THE performance of indoor gliders has increased so much during the last year that it probably has been difficult for many builders tot keep up with the record ships and their performance.
Careful duplication of the model described in this article will give you a high‑performance glider. The original is the record holder. Its highest official time has been 43.6 seconds, but it has surpassed this record several times in unofficial flights, the longest being 46.1 seconds. One thing we recommend in glider construction is not to finish any part of the model with the words "That's good enough," but continue until you've reached the ultimate in good shape and smooth finish.
A record‑breaking glider must be built from the best grade of wood. The best type for the wing is semi‑quarter grain. This is named from a method of cutting balsa which gives the wood a speckled or flaky appearance. This wood is the strongest for its weight and does not have a tendency to warp. One street of 1/8 x 3 x 18" will be enough for the wing.
After you've selected the material, start by cutting the wing halves to shape, making sure they are identical. Next shape each half to the indicated wing section. This section should be carried through both halves of the wing.
Sand with the finest sandpaper obtainable ‑ #10‑0. The wing halves should be identical in shape, size, and weight. Several materials can be used for the wings, banana oil, microfilm or a balsa polish. Give each wing two coats of polish with intermediate sandings. The last coat may be finished by rubbing it with the back of the sandpaper.
After the wings are polished to perfection, give them a coat of wax, being careful to see that none gets where the cement is to be applied. The halves should be cemented together at the proper dihedral angle.
TAIL SURFACES
The tail surfaces are made from the same type of wood as the wing. A piece of sheet balsa 2-1/8 x 1/32 x 12" will be sufficient for the elevator and rudder. These are sanded to a streamline section. The method of finishing and polishing is the same as with the wing. Be careful that the tail pieces do not warp when they are polished.
FUSELAGE
A piece of medium hard straight-grained balsa 3/16 x 1 x18" will be needed. The hard balsa is used as it must take many bumps and shocks. The fuselage is shaped to the sections shown on the plans. The wood should be sanded, finished, and polished just as carefully as the wing and the tail, several polish coats being used to minimize skin friction and strengthen the fuselage.
ASSEMBLY
After all the parts are dry, they should be cemented together in their proper positions ( see plan) taking care that they are lined up accurately. Be generous with the amount of cement, as the added weight will more than pay for itself with added strength.
After the parts have been lined up and cemented, allow time to dry. Then add a balsa ‑ wood fillet where the wing joins the fuselage. This fillet will add strength and reduce the danger of "throwing off the wing" when you give the model a hard launching.
ADJUSTING AND LAUNCHING
"I had a real record breaker, but it dove in and smashed beyond repair." How many times have you heard this familiar phrase?
Because the "pay ‑ off" comes on crates that make record flights and not on the ones that could have, we are going to try to give you some hints that will help you adjust and fly your ship with a minimum of crack‑ups.
After the model is finished and you've rechecked the wing and elevator settings, balance the model on the tips of your two index fingers, supporting it at the wing tips. Any necessary change in balance can be made by adjusting the amount of clay on the nose of the fuselage. Modelling clay available at the 5‑and‑10‑cent start: is used.
The model is then ready for a trial glide, which is made from about 4 feet altitude. If the ship glides satisfactorily it can be given a faster launching, keeping it banked the way it naturally turns. After several of these launchings, the best setting ran be obtained. The model is then ready it its first hard launching. Rut try numerous easy launchings to acquaint yourself with the model before trying hard throws.
When you decide to try, for some altitude, do not hesitate when you throw the model. Try for maximum height, as the model has an excellent chance of recovering before it could dive into the ground, giving you a chance to make adjustments. A "half‑way” to a medium height will hardly give the model chance to recover, and the crash into the hard floor of an armory or auditorium will result in serious damage. Then, too, if you launch the glider to a high altitude and it doesn't recover, you'll have a good chance to get under the glider and catch it before it hits the floor. The modeling clay on the nose serves admirably in cushioning the landing.
When adjusted, the original model climbed in a right bank until the peak of the altitude was reached and then, banking to the right, it glided to the ground in rather tight circles. Each builder has his individual method of launching. We use a side‑arm motion. That is, hold the model with the wings vertical, as though the model were doing a vertical bank. Swing your arm forward in a wide circle, giving the model additional speed with a snap of the wrist just as your arm reaches its most forward position. The natural bank of the model is opposite to the bank at launching. Thus, if you're right‑handed, your model should glide in left circles after it reaches its peak altitude.
This model can be flown outdoors. It twill not qualify for official outdoor glider contests; however, it will deliver excellent flights. Being lighter than the average outdoor glider, it will need less of a rising current to carry it away. Any high‑ceiling building will serve for indoor flying. A good launching on a record flight will probably send the model as high as 80 feet. But there are plenty of good flights to be made with a 40‑foot ceiling.
SPECIFICATIONS
Wing
|
Aspect ratio |
6.1 |
|
Span |
13‑1/2 in. |
|
Area |
30 sq. in. |
|
Incidence |
0 degree. |
|
Sweepback |
5 degree. |
|
Dihedral |
14 degree |
Elevator
|
Span |
5 in. |
|
Area |
7.7 sq. in. |
|
Aspect ratio |
3.3 |
|
Area |
25% of wing area |
Rudder
|
Height |
2 in. |
|
Area |
3.2 sq. in. |
|
Aspect Ratio |
1.25 |
|
Setting |
Neutral |
|
Area |
9.4% of wing area |
|
Total Weight |
.26 ounces |
Best official flight (record) 43.6 second.
MATERIAL
|
1/8 x 3 x 18" semi‑quarter‑grained balsa for wing |
|
1/32 x 2‑1/8 x 12" (same variety) for tail surfaces |
|
3/16 x 1 x 18" for fuselage |
|
banana oil, microfilm solution or balsa polish; wax, cement, modeling clay, #10‑0 sandpaper |
Scanned From March 1937
Air Trails
![]()
[ Home ] [ Previous Plan Pages ] [ Special
Things ] [ Earl Stahl Plans ]