The Plan Page
[ Home ] [ Previous Plan Pages ]
[ Special Things ] [ Earl Stahl Plans ]
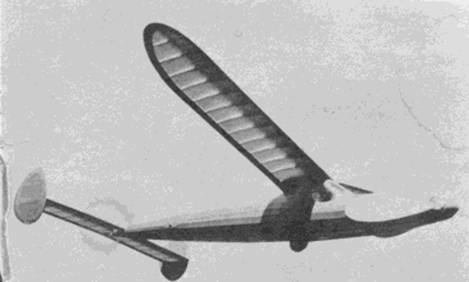
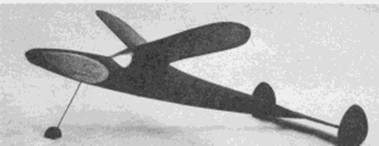
Smoothie
BY HENRY COLE, JR.
Wake up and live if you are a last‑ditch builder of
"boxes."
This streamliner proves construction can be simple. Good flier!
DRAWINGS BY DOUGLAS ROLFE
The first test model of this design was built in the spring of 1941 1 to take to the Nationals. The model was so stable that it required only two test flights to adjust it. On its third flight it was wound to maximum (1,300 turns) and launched on an official flight in a local contest. It climbed so fast on the initial burst that it was difficult to follow with the eye. When the tensioner caught, the model was a mere speck above, having climbed almost out of sight on the motor run. At 2:27 the timer clicked his watch and declared the model out of sight. Still dazed by the amazing climb we had just seen, we were disappointed at losing the model, but thoroughly inspired to rush another one into production for the Nationals.
This model had the same aerodynamical set‑up as the lost one, but the fuselage drag and skin friction were cut to a minimum due to a new streamlined cabin design. Characteristics of the Smoothie were exactly the same as those of the test model with the exception of a greatly improved glide obtained through better streamlining
After countless successful test flights, the model was entered in the 1941 Nationals with high hopes. However, when winding for the first flight, we were up to one thousand turns and still going strong when the motor broke. By the time repairs were made, the best conditions were gone, so we did not have a chance to make any long soaring flights.
CONSTRUCTION
Before starting construction, remember that, success with a model depends on accurate and light construction. Save weight. wherever you can, but not at the expense of weakening vital parts such as prop mechanism, landing gear and rear motor anchor. With careful wood selection, this model can be built down to three and one half ounces without the rubber.
For strength and lightness, the fuselage formers should be cut from laminated 1/32" sheet balsa. Lay the sheet on a flat surface, cut short lengths equal to the width from another sheet glue these cross‑grain and press until dry. While the laminated sheet is drying, cut out the keel outline and glue it in place on the full size side view. Next cut the wing mount half and glue it to the keel, making sure that it has the proper angle to fit the wing dihedral. Now cut the formers from the laminated sheet and glue them in place to the keel outline. Lift the half‑completed construction from the drawing and glue the other half of the formers in place.
When all formers have been checked for accuracy, add the 1/8" square side stringers, making sure that the keel remains straight. Before adding the 1/16" square stringers, complete the rear motor anchor, the 1/16" sheet cabin covering and the retractable gear.
The retractable gear is strong and reliable if a good soldering job is done on the crossbar. Be sure to reinforce the keel with 1/8" sheet side braces at the keel slot and wheel well. The slot in the keel at the pivot point is cut just right to hold the gear at the proper angle for take‑offs. On the original, the inside hook of the retractable gear was guarded with rubber tubing to prevent the possibility of the rubber motor catching. Also, the well for the wheel was sealed to prevent the entry of dirt which might chafe the motor.
The wing and tail constructions are conventional with the exception of the sheet covering. The 1/32" sheet should be sanded to a smooth finish on a flat surface before it is added to the completed wing and stabilizer. Note that the center section of the wing at the dihedral break is covered both top and bottom with 1/32" sheet. The stabilizer has a slight taper, but ribs can be easily estimated and the high spots removed with a sanding block.
The low‑pitched prop is carved to true helical pitch from the blank shown on the plans. When the proper airfoil has been carved, mark the place for the folding prop cut, cut the center section to the proper dimensions and cut the blade outline. Before cutting the blade break, glue the folding mechanism in place and wrap it tightly with silk strips. A little experimentation may be necessary to get the blades to fold correctly, but a perfect folding mechanism is well worth the effort.
The spinner may he easily turned, even if you don't have a lathe. All that is needed is a hand drill and a vise. Place the piece of wire in the chuck, run it into the spinner block and bend the wire back to prevent slippage. Carve the spinner to the approximate shape, and then proceed to turn out an excellent spinner with sandpaper in one hand and the crank in the other. Cut the spinner in half, hollow it out and then fit it to the prop hub. The joints should be filleted with balsa dust and glue.
Finish the prop and spinner with wood filler and glider polish. As soon as the finish is dry, cut the nose of the spinner off and hinge it so that you will have access to the winder hook. Do a good job on your prop and you will notice the difference in performance.
Silkspan considerably simplifies the covering problem. By applying it wet the fuselage may be covered in six pieces. Be sure to pull out all the wrinkles, because streamlining is useless without a good covering job. Don't forget to sand all the frame‑work before covering. Enough dope is added to fill the pores. After light sanding, the model is completely painted with it coat of gloss to prevent sag and strain on the stringers due to the tightening effect of dope. The final step is to fair in the wing mount with balsa strips so that the camber makes a perfect fit with the wing mount .
Measure out enough rubber for ten strands of 3/16” ninety‑six inches long. Put about forty winds in it and double it so that you have a braided motor of twenty strands of 3/16”. The motor is pulled through the fuselage with a string and the aluminum tubing rear motor anchor is put in place. Maximum number of turns, according to tables, are 1,150; we got in 1,300 once. Don't try it! Completed model with rubber weighed a little under seven ounces.
FLYING
The Smoothie pleasantly surprised us on the field because no thrust adjustments were necessary. ln some cases, though, a little downthrust may be needed. The only necessary adjustments are right wing panel warped to additional incidence (looking from front), and a slight bit of right rudder. The model should balance at a point directly over the center of the wheel in the retracted position. When correctly adjusted, the flight path should be as follows: wide right circles in climb without excessive banking, and tight, flat, right circles in the glide without mushing or stalling tendencies.
This model has been tested in winds up to 25 m. p. h., so don't let a little breeze scare you. If properly adjusted, the model will handle well in any kind of weather. When your model is adjusted and you witness the first full power flight, you should be well pleased with its fast, smooth climb and flat, soaring glide. May you soar to new heights with your Smoothie!
BILL OF MATERIALS
| 2 | 1/32 x 3 x 36" soft (formers) |
| 1 | 1/8 x 2 x 36" soft (keel, wing tips, rudders) |
| 1 | 1/16 x 2 x 36" soft (ribs, cabin covering) |
| 3 | 1/32 x 2 x 24" medium (leading edge covering) |
| 3 | 1/8 x 1/8 x 36" medium (longerons, stab., L. E.) |
| 1 | 3/16 x 3/16 x 36" medium (wing L E.) |
| 3 | 1/8 x 5/8 x 20" soft (trailing edges) |
| 16 | 1/16 x 1/16 x 36" medium (longerons) |
| 1 | 1-5/8 x 2-1/2 x 17" medium (prop block) |
| 1 | 2 x 2 x 2" soft (spinner block) |
| 1 | 1/16 x 2 x 2" plywood |
| 1 | 1‑3/4" diam. wheel |
| 3 | sheets red Silkspan (light grade) |
| 1 | bobbin |
| 1 | wood screw |
| 1 | length 1/16" music wire |
| 1 | small sheet 1/32" aluminum |
| 2-1/2 feet (inches?) | 3/16" aluminum tubing (motor anchor) |
| 1 | ball‑bearing washer |
| 1 | tensioner spring |
| Soft iron wire (landing‑gear binding) | |
| 80 feet | 3/16" brown rubber |
| Silk strips and thread | |
| Lube, glue, wood filler, dope and gloss | |
| Celluloid |
![]()
![]()
![]()
![]()
![]()
![]()
![]()
![]()
![]()
![]()
Scanned from September, 1942
Air Trails Pictorial
[ Home ] [ Previous Plan Pages ] [ Special
Things ] [ Earl Stahl Plans ]