|
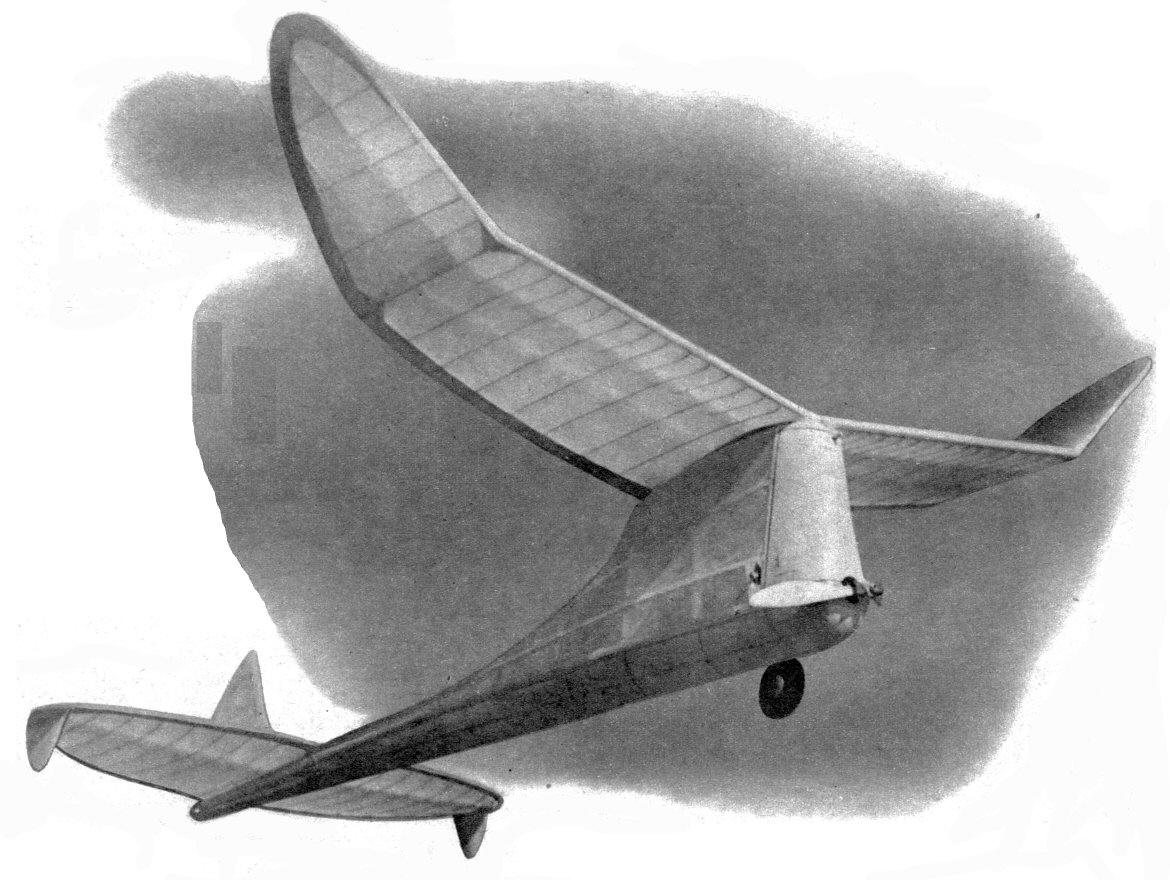
Shulman's ZOMBY
BY LEON SHULMAN Its 1941 record: 13 first places, a second, a third, and
three fourths.
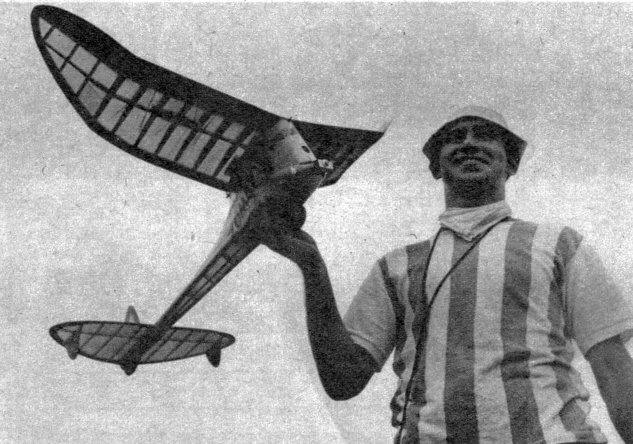
To place or win or get satisfying flights in any competition, a model has to "have more" than the next ship. After studying the basic design of winning ships over a long period of time, it was decided that these characteristics would, at the most, give me a model equal to the best in competition. But to assure consistent winning performance, a model had to have a certain something extra. So it was decided to include dynamic soaring tendencies in the design of this new ship. The glide came first. Getting the model up high and fast was the next important consideration, so that extreme stability under power had to be attained. For maximum efficiency a folding propeller and retracting landing gear were employed. THEORY The first problem was designing a force arrangement that would give a slow, stable glide with as little sinking speed as possible. Since a low wing loading is a basic requirement for a slow, flat glide, the wing area was calculated to give an eight-ounce wing loading for the engine used. Secondly, an efficient airfoil had to be employed. Going over past experiences, I decided on a section having its high point on the upper surface approximately twenty-five percent to the rear of the leading edge and having a narrow cross section with a rounded leading edge and a bit of undercamber starting at about five percent of the chord, then tapering off gently with a slight reflex trailing edge. The location of the center of gravity, center of lateral area, center of lift, center of resistance, had to be found and placed in their respective positions so that all centers would operate in harmony. Locating the center of gravity as the basis, the center of lateral area was placed behind and above it so that when a line was drawn horizontally through the C.G. as the base line, and a line drawn through the C.G. and the center of lateral area, it would intersect the base line at an acute angle of eight degrees. This arrangement made for a steep spiral climb with exceptional stability, providing the line of thrust was set at a line parallel to the line passing through both the C.G. and center of lateral area. The center of resistance was the next problem. The location of this force had to be in the proper position to cause a climbing tendency while both under power and in the glide. This force was then located sixteen percent of the chord above the C.G. Locating the center of lift was the next step. The location of this center was extremely important because it controlled the climbing attitude of the ship while under power and in the glide. The center of lift was placed at eighteen percent in front of the center of gravity with a tail moment arm of fifty-five percent of the wing span. A large stabilizer with a symmetrical cross section was set at a positive angle. The smaller the model the greater the positive angle, and viceversa. Tail area was thirty-five percent. The rudder area was obtained by the profile cardboard-pattern method and proved too large because of a spinning tendency. After experimentation, the rudder area was decreased above the horizontal C.L.A. line and increased below this line. This was done by giving the rudder a higher aspect ratio above the horizontal line and adding two extra subrudders on the stabilizer to increase stability on take-offs and landings. The line of thrust was placed below the C.G. at a downward angle to give stability in the climb and yet produce a nosing-up tendency under power. The thrust line ran parallel to a line drawn through the C.G. and the center of lateral area. This arrangement allowed the model to have a steep climbing angle with a turning tendency. ACTUAL TESTS The first tests were made with a Bantam-powered Zomby of fifty-four-inch wing span. The first day, after some looping and stalling, the model hooked a riser and floated away after thirteen and a half minutes O.O.S. Under a little better than half power, the model would climb in a slight bank at a high angle, rolling out on top as the motor shut off, into a slow, flat glide. This original model, with the revisions, was the basis for a fleet of (seventeen) Zombies that were built, flown and lost this past contest season. The second model built was the Baby Zomby for a super Atom engine, This model, having a thirty-three-inch wing span, was really surprising. Finished, weighing just ten ounces, the model turned in sensational gliding exhibitions. I believe this model had more time in the air by hand gliding than on power flights. This particular ship had a wire skid for its landing gear and a celluloid-lined hollowed-out balsa cowl for its tank. Shortly after, an Ohlsson 60 Super Zomby was built. The climb was a little slower than the others (due to its large size) but the glide was amazing. The first day out it turned in a timed flight of 3:52 on eighteen seconds at sunset. At its first contest it turned in a timed official flight of thirty-six minutes flat O.O.S. on eighteen seconds. At the Nationals, a "C" Super Zomby turned in an official flight of ten minutes and five seconds for Sal Taibi, to win for him the National Class "C" Championship. The next Super Zomby to be built was the intermediate Super Zomby for both Class B and C. While powered by a Forster 29, it turned in an eight-and-a-half-minute timed flight, and when powered by a Comet 35, won the Philadelphia contest for highest single time, highest total time, and first place in Class C, besides the meet's championship. Further accomplishments of the Super Zomby fleet are given in the following section. RESULTS
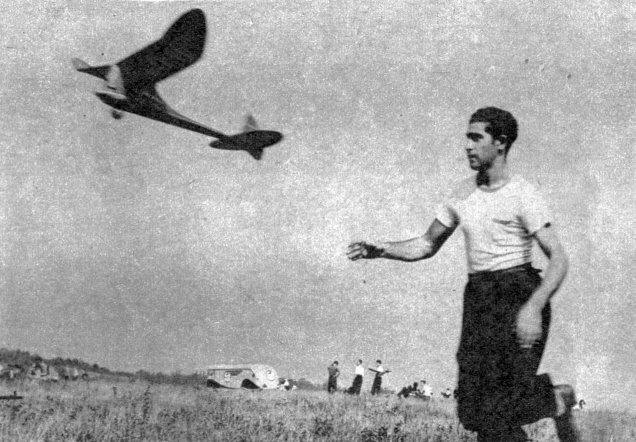
CONSTRUCTION The crutch, or foundation, of the model is made by splicing the hardwood motor bearer supports to the main longerons, then joining the two by laying them on the top-view plan and cementing in the cross braces. The firewall is cut to shape from the required wood and cemented into position. The wing platform should be cut to the size indicated and sanded smooth before cutting it down the center. This cut goes only half through. The platform is cracked along the cut, to attain the required angle, then the angle joint is cemented and the wing dowel fitted into the crack on the apex side of the platform with plenty of cement to hold it in place. The top keel is now cut from the required wood (which should be close-grained and fairly hard) and joined to the bottom of the wing platform at one end and the cross brace at the stabilizer at the other end. Care should be taken so that the joint between the wing platform and the top keel gives the platform 0 degrees incidence. The uprights should now be inserted between the crutch, platform and the keel. The former on the bottom of the fuselage directly to the rear of the gear is now cemented in position and the bottom keel fitted to it and the rear of the fuselage at the crutch junction. The uprights should now be inserted and cemented. The nose block (of soft balsa) is now cemented in place and, when dried, hollowed out and shaped to conform with the lines shown on the side view. The landing gear is the next project and should be bent of the size of wire indicated for the particular size of model. Atom-powered 1/16" wire, Bantam or Ohlsson 3/32" wire, Forster or Comet 35 or O. K. 49 Cannon, Tiger 1/8" wire, Ohlsson 60, Super Cyclone 5/32" wire if possible, or 1/8" wire. The shape of the wire and the bends are shown on the plans and the wire should be bent as closely as possible to this shape. The two legs (front and rear) are joined by the method illustrated on the plans, making sure that good soldering is done on the job. Care should be taken so the legs line up properly and work smoothly. The gear is then mounted into the fuselage at the indicated position by cementing and binding the rear leg brass-tubing hinge to the cross brace between the crutch (this brace should be of very hard balsa wood). The board that holds the retracting spring holder and the board that holds the aluminum or brass sheet (which delays the action of the retraction) should both be cemented firmly in place and allowed to dry. The slotted brass tube which holds the suction cup should be soldered in place and bound with thin wire and resoldered so that a good joint results. The suction cup can be obtained in any dime store at the toy counter where toy pistols that shoot suction cups mounted on a dowel are sold. Either a black, brown or red suction cup can be used. This rubber cup should then be cemented and bound in place with fine thread. Plenty of cement should be applied and when dried should be gone over with tire shellac. The spring is now bent from the required wire to the shape shown (it need not be exact; it has been proven by others that a spring bent with flat-nosed pliers and to a, similar shape does the same job) and connected to the spring holder on one end and the rear landing-gear leg at the other end. A box of 1/8" sheet balsa should be built around the spring to prevent the spring from twisting to either side when the gear is extended. The aluminum or brass plate is now cemented to its base board and allowed to dry thoroughly. The wheel should be soldered on and the gear pulled out to take-off position and timed until it retracts without assistance. The model should be held at approximately eighty degrees inclined until it retracts. When set this way it should take a few minutes to retract because of the good suction within the cup. To hasten the retracting action, slide a razor edge across the metal sheet a few times, causing slight scratches. Enough scratches should be put on this metal to allow the gear to retract after approximately ten seconds. If the gear retracts too quickly for some reason or other, a drop of glycerin in the cup will delay the action. When the retracting time has once been set, it should remain so for approximately 1,000 take-offs. The sponge-rubber shock pad is then cemented onto the landing-gear stop to absorb some of the shock of landings, and to absorb the retracting shock. The cowl formers are then made and pinned into place in the nose and planked with the required size of wood. The cement holding these together should be allowed to dry overnight or longer, then sanded with a sanding block to a smooth finish. The cowl is then cut loose from the firewall, platform, and motor bearers, by wedging a sharp knife between it and these parts. The exhaust and air intake holes are then cut out and sanded. These holes should be cut to accommodate the engine to be used. The trapdoor on either side of the cowl should be cut with enough room for your fingers to operate the engine successfully. This door should be sanded slightly on all sides so that it will fit loosely into its original hole. Any simple hinge can be used. A handle should be cemented onto the door and a hook on the inside of the door and one inside the cowl in front of the door, so a rubber band can be connected to these hooks and keep the door closed when required. Balsa stops are then cemented inside the cowl at the corner of the door opening to prevent the door from being pulled into the cowl by the rubber band. The next step is to install the ignition system. The battery box should be strong. It is suggested that the Austin battery case be used for all the Super Zombies except for the Atom-powered. The battery box should then be screwed and cemented to the fire wall (F-2) directly behind and above the engine, on the outside of the fuselage inside of the cowl. The coil should be mounted against the firewall and at the junction of the firewall and cross brace between the crutch at the nose. The timer should be mounted against the firewall above the coil (it is suggested that an Austin Timer be used for its light weight and reliability). The condenser can be mounted at any location, but as close as possible to the coil so that shorter wires can be used. The wiring diagram is shown and is conventional. It cannot be too strongly stressed that good soldering, good wire, and a safe distance between these wires be maintained to insure a good ignition system. It again can be repeated that a motor is no better than its ignition system. The stringers can now be fitted and cemented into place and then sanded to form a smooth contour for the covering. The motor mounts should then be made of hardwood, maple or birch. These mounts should be cut to size and tapered to accommodate the motor at the thrust position indicated (eight degrees downthrust). These mounts are bolted in place to the motor-mount bearers, and the motor bolted to the mounts. This method allows a motor movement of approximately three degrees in any direction. The folding prop is the next project and requires less effort than one realizes. The hub is cut from a sheet of aluminum and bent to a U-beam shape and a hole large enough to accommodate the engine's crankshaft is drilled into the exact center. The prop blades are cut from a good prop (or two identical blades from broken props) and the hubs cut away so that the blades fit into the aluminum center freely. A hole is drilled through the hub and the prop blades so that a bolt or pivot can fit through freely. The hole should be approximately 5/8" from the center. The distance from the hole in the, prop blades to the center butt edge of the prop should be the radius of an arc cut from the wood; from the center edge to the front edge of the blade. The outer corner of the hub should then be rounded with a file. A sketch of the folding prop is given on the plans. Now for the wings. The best method for building these is to begin with joining the main spars so that proper dihedral will result. These spars should be straight-grained hard balsa and should have marked on them lines that indicate where each rib should go. The ribs should then be cut from the required sheet balsa for the size model to be built. All sheets for ribs should be straight-grained and of medium-hard stock. The dihedral joiners should then be cemented into place on the spar joints, using cement generously. The ribs should then be placed and cemented onto the spar at their respective positions. The leading edge is placed and cemented to the ribs. The trailing edge of straight-grained medium-hard balsa is cemented to the wing, making sure that at the tip dihedral joint the trailing edge is raised a quarter inch. The wing tips are cut to shape from the required thickness of sheet balsa and cemented to its place on the wing. The top front spar should be cemented in place and joined, using the method shown. The leading-edge sheet balsa should be of straight-grained medium-soft stock and cemented into place, taking precautions to make good joints at the dihedral breaks. It is suggested here that the wing tips be sanded first before cementing the sheet to it so that a thin, smooth section will result at the tip. The cap strips are now cemented in place, using plenty of glue at the joints. The center wing-section rest is then cemented in place and the gap between the rest and the center spar filled in with scrap balsa. The leading edge should be carved down to the required outline and the remainder of the wing sanded along with it to a smooth finish. The wing tips should be sanded to as thin a section as practical. This will add to the efficiency of the wing. The outline for the stabilizer and rudder should be cut from the required thickness of sheet balsa. The outlines should be joined and cemented in place with the spar and ribs fitting snugly in place. Plenty of cement should be used to prevent the tail from warping when completed and doped. The surfaces should now be trimmed with a sharp knife and sanded first with rough sandpaper and then with fine sandpaper to give a smooth cross section throughout. FLYING Testing the Super Zomby should be comparatively easy compared to othermodels because of the great amount of experimentation done to make the model an exceptionally stable ship. With the incidence required in its proper location, and the model absolutely free from warps, the ship is glided into the wind, preferably in tall grass. It should be test-glided until it glides flat and far with a gentle heave. Do not adjust the model to glide slow and mushy (tail-low) from the hand glide. This adjustment is a mistake made by modelers who think that because their model glides slow and tail-low from the hand they have a good gliding ship. The Super Zomby, when adjusted to glide flat, far, and not too slow from the hand will, when up a few feet, glide far and exceptionally flat and take advantage of every ground riser. If the model glides mushy when being tested, add some positive incidence to the stabilizer to keep the tail up and increase the length of its glide. Keep test-gliding until the proper glide is obtained. Turn the rudder so that the ship will turn to the right in the glide. Test-glide the model again several times and note that it should turn slightly to the left with little or no bank. Now comes the fun -- testing the model under power. First, offset the motor a bit to the right, approximately one degree. Second, check and see that the eight degrees of downthrust is still set. Third, test the motor and see that it runs without sputtering or cutting out. Fourth, check to see that the batteries are good, the flight timer working properly and all adjustments set properly. Fifth, start motor, set it at half speed, leave gear retracted, set timer for approximately ten seconds and then throw the ship gently into the wind. Note how the model behaves, which way it turns under power, the climbing angle, the glide, and its direction. With the above adjustments, the model should jump from your hand, go a few feet forward and then nose upward to about at forty-five-degree angle and climb in a left or right banking attitude until the motor shuts off, then roll out into a glide to the left. If the model behaves properly, send it up again, following the same procedure step by step, but give the motor a trifle store power. Keep retesting with more power each time until finally the model jumps from your grasp and noses straight up and climbs like a hornet in a banking attitude, then on motor shut-off, glides to the left or right. The turn under power and in the glide is optional and will work successfully. I have found that with the Zombies I have flown a climb and glide to the right is the most efficient because there are no counteracting forces (such as left thrust and right rudder and vice versa) . Other builders, however, found that they got good results with the opposite adjustments, so use your own discretion. After the model has been flight-tested, the retracting gear should be tested. With the motor set at the best speed (for maximum performance) pull out the gear, set the model on a smooth, long surface and hold it back of the wing where the wing rubber goes around the dowel. Release the model and away it will go for a few feet, then zoom up until the gear retracts. The speed and climb will increase still more until power shut-off. The glide will be one of the slowest and flattest ever seen, and the landing like that of a soaring glider "rolling in" on its one wheel.
Scanned From April 1942
|
||||||||||||||||||||||||||||||||||||||||||||||||||||||||||||||||||||||||||||||||||||||||||||||||||||||||||||||||||||||||||||||||||||||||||||||||||||||||||||||||||||||||