|
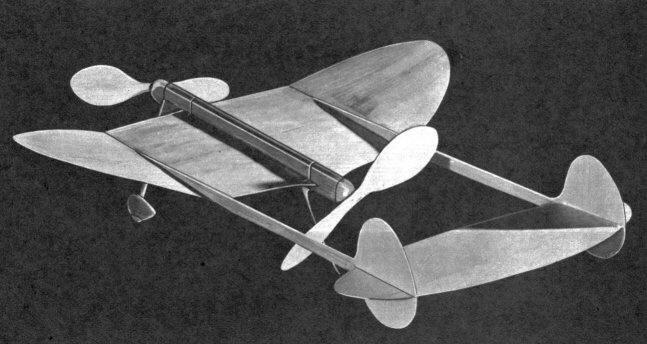
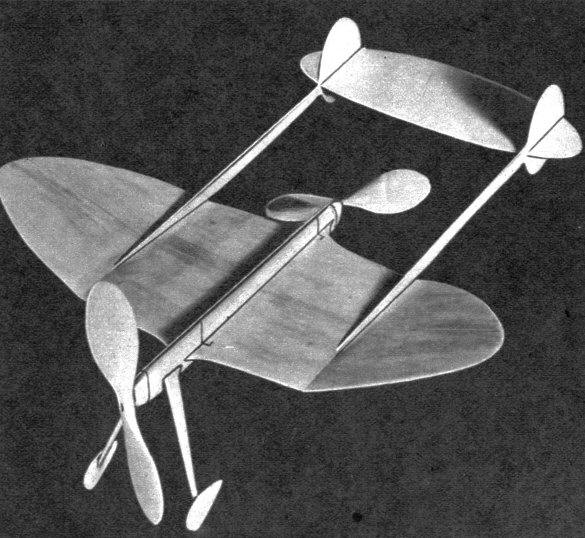
The Flying Pie Plate If stereotyped models have you in a rut, try this novel
all-balsa push-puller. BY BILL TYLER
The stubby wings, tail booms, push-pull props FOR the benefit of the fellows who are tired of the everyday model designs, and those who are the experimentally minded, Air Trails presents this thirteen-inch all-balsa model. Designed as an experimental ship for speed contests, it can be built for twenty cents. The two propellers turning in opposite directions eliminate all torque problems, while the short wing of low aspect ratio and symmetrical airfoil reduce wing resistance to a minimum. These features, combined with a clean design, make for an exceptionally fast model possessing a high degree of stability that often is lacking in ships of this type. Weighing slightly over three ounces complete with motors, it has exceptional flying ability and speed. Outdoor flights of well over 200 feet are easily obtained by using a winder. Testing for speed in an armory revealed that the ship was traveling around forty miles per hour, which is some speed for a model of this size. An enlarged model of the same proportions would hold its own with the best of the speedsters. To bring this model up to the sixty-mile-per-hour class it will be necessary to enlarge the drawings at least one third, increase the power, and carefully dope and wax all the surfaces. Eliminating the landing gear will also increase the performance. By using this design as a base, many adaptations will be apparent to the contest-minded modeler. The author contemplates a stick model built along these lines. Remember, the "push-pull" offers the most efficient way of reaching a high power-to-weight ratio which is one of the important factors governing climb. So think about "push-pulls" for that next trophy winner. CONSTRUCTION Study plans carefully before attempting construction. Select a sheet of very light 1/8" quarter-grained balsa for the wing. Enlarge the wing drawing to full size; the squares around the outlines represent 1/2". It will probably be necessary to laminate the wing in three pieces, since this size of stock is usually cut only in three-inch widths. Be careful of the seams and precoat well before assembling. When the wood has been laminated to the desired width, transfer the wing outline to the wood. (Note that the wing is constructed in two halves and is held to the fuselage by wing clips.) Cut wing outlines to shape and sandpaper to the streamlined section shown on the drawing. Finish the sanding with "00" paper and apply several coats of glider polish (made from one ounce of clear dope, one ounce of clear lacquer, and several drops of castor oil to prevent warping). Add the dihedral of 1-1/2" under each tip, precoating all joints before joining. Allow at least one hour for drying. Bend the wing clips from .022 piano wire to shape shown on plan. The wing is set at zero degrees incidence, so both clips are the same size. Note how the "hooked" part of the clip goes through the wood to the underside of the wing, where elastic bands hold the wing and tail unit to the fuselage. Extreme care must be taken in bending the clips, as the flying ability of the model depends greatly on their alignment. Cut tail booms, or outriggers, from 1/16 x 5/16" hard balsa tapering as shown on drawing. Round off the corners and glue to the wing. Be careful to see that they line up with the angle on plans. Enlarge stabilizer in same manner as wing and finish with glider polish. Rudders are made in two pieces from 1/32" sheet, these being glued to top and bottom of stabilizer. When tail assembly is completed, glue securely at tail booms. Cut the props from fairly firm balsa 5 x 1 x 5/8", using the conventional layout method. Carve with 1/16" undercamber, round off the corners, sandpaper smooth, and finish off with several coats of glider polish. Balance by giving the offending side extra coats of polish. Bend propeller shafts and rear hooks from .032 piano wire. Don't place shafts in propeller until nose plugs have been formed. Carve nose blocks from laminated 3/32" stock. Sandpaper to flow in with fuselage shape and apply several coats of clear dope. Drill propeller-shaft holes which are offset three degrees for downthrust. Add a bushing at both ends of shaft hole for smooth running. Glue in rear hooks. Assemble propeller shaft and nose blocks, add washers, propellers, and bend shafts in a U shape and secure in propeller hub. Add a drop of light oil to washers to reduce friction. Now for the fuselage. From scrap balsa, make up a template of the fuselage in the same manner that is used in making motor sticks for indoor models. Then soak a piece of 3/64" sheet balsa in hot water until thoroughly moist, and bend the balsa around the form and hold in place with strips of tissue or gauze. Allow to dry thoroughly, remove binding, slip shell from form, and glue up the seam. Sand off any roughness and strengthen with several coats of dope. Make certain that wing clips fit cross section of fuselage, so that the wing is kept in the same position on every flight. Landing-gear struts are cut from 1/8 x 1/2" hard balsa and taper to 1/4 x 1/8 at the tips. Glue securely to fuselage and check for correct alignment. Wheel pants are shaped from 3/32" sheet balsa. Moving wheels are optional, and if used, will have to be made from 1/16" sheet. This model is powered with two loops of 1/4 x 1/30 x 10" of brown special contest rubber which has been well lubricated to assure maximum turns and power. These motors will take up to a maximum of four hundred turns if wound on an eggbeater winder. FLYING Check the thrust line carefully to see that at least three degrees of downthrust have been placed in each nose block. Now try gliding the model, moving the wing back until a fairly flat gliding angle has been reached. If the model has been carefully constructed and specified weight wood used for the surfaces, it will not be necessary to add weight to the nose. Next try a short test flight, using but a few turns in the motors. Observe the flight characteristics carefully. Watch for any mushing tendencies, which must be corrected with more downthrust or by moving the wing farther back. Flying and speed performance depend, of course, on how carefully the model has been built, but if you've done a smooth, well-polished job, you'll find it difficult to keep your ship from zooming out of your hand for at least two hundred feet. Scanned From February, 1942
|