|
AIR YOUTH GLIDER N0.1 By W. F. Tyler THIS MODEL. FEATURING HARDWOOD CONSTRUCTION AND
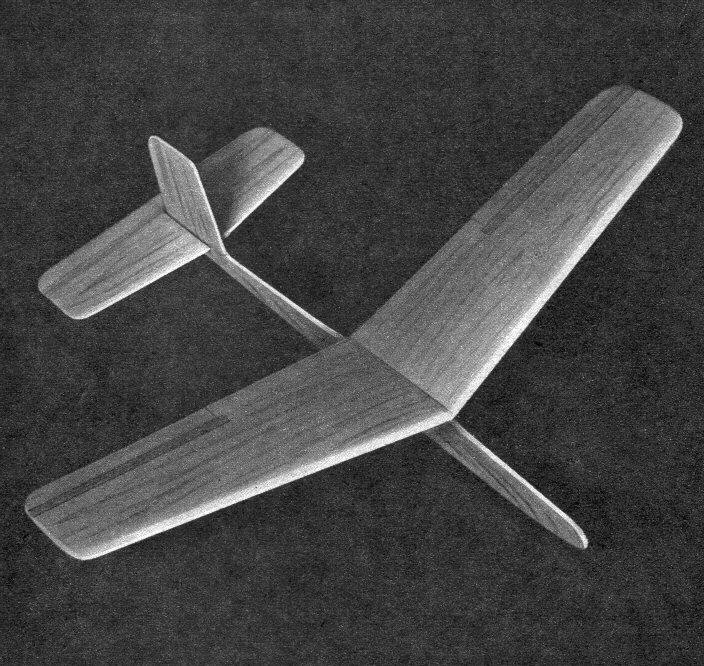
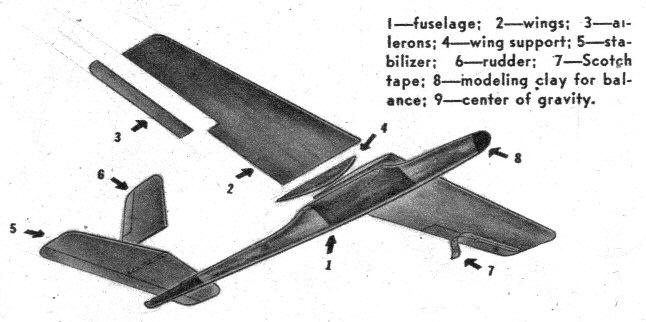
AIR TRAILS offers this simple, hand-launched glider as the first of a series designed for classroom construction. It incorporates all the qualities required for a successful flying model, yet its construction is simple enough for a novice. It differs from the usual hand-launched model in that hinged control surfaces have been added so that, by experimenting with different control settings, the student "learns by doing." The model is built from sugar pine, but other hardwoods can be used; additional weight means increased flying speed, but the gliding angle remains about the same. Enlarge the drawings to full size by using the graphic scale given. After the enlargements are made, make cardboard patterns of the various parts. Start the wing construction by tracing the wings (2) onto the wood (Fig. A); cut the extra wood down to the outline. Use a sandpaper block to finish the tips and remove irregularities (Fig. B). Hold the wing halves together while sanding to keep the outlines identical. The wings are tapered to 1/16" Begin the shaping (Fig. C) by taking off thin shavings with a small block plane; check the contours after every few chips. Keep the trailing edge, rear edge of wing, as thin as possible. Finish to size with rough and finally fine sandpaper (Fig. D). Bevel the ends of the wings for the proper dihedral angle (Fig. F.). Block up once wing tip to 3" and carefully sand the bevel until the angle matches the dihedral (Fig. I). Wing supports are now made from 1/16" sheet. Make certain that the top slope of the fuselage is at the proper angle for wing (see Fig. G). Make the stabilizer (5) and rudder (6) by the same method as the wing: both have maximum thickness at center of 1/16" and taper to 1/32" at the tips. Give all surfaces one coat of clear dope and a final sanding. Cut the control surfaces (Fig. F), and hinge with Scotch tape. Check the model over carefully to make sure that everything is in line. For ordinary flying, all the controls should be set at zero. If your controls are extra flexible, a small piece of Scotch tape placed over the edge of the controls and the main surface will keep them in line. Add weight, preferably modeling clay or putty, to the nose until the model balances at 9 (side view of main plan). If the model tends to stall, add more weight until the plane glides in a straight line. Once the adjustment is correct, you can use more powerful launching by turning the rudder slightly to the left so that the model glides in counterclockwise circles. Then turn the right aileron down slightly to hold the circle adjustment.
Scanned From April 1943
|