|
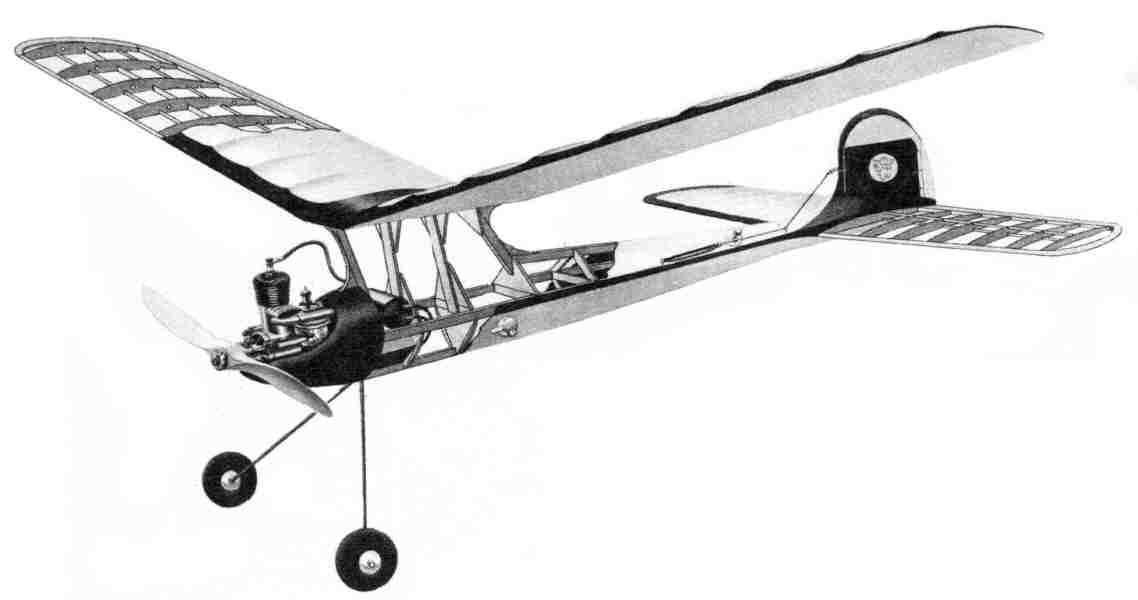
DESIGNED FOR PINE BUILD THIS ALL-PINE CONTEST WINNER
DEVELOPED BY NACA EXPERT.
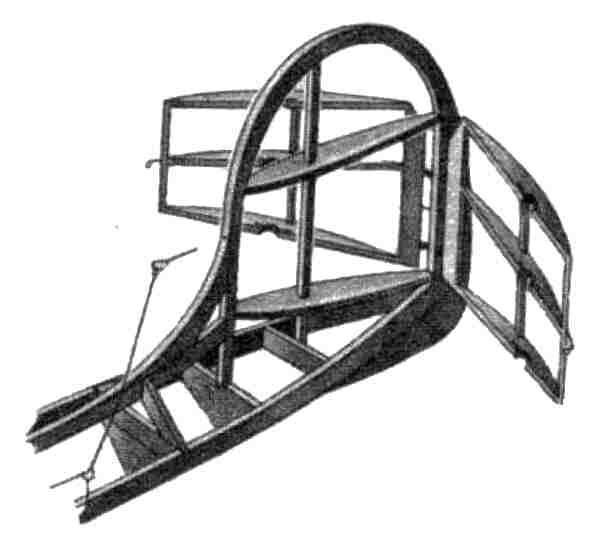
"WHAT! build a gas job with white pine" Now wait a minute, pine isn't heavy. As a matter of fact, it's a soft wood, while balsa, as probably few of you know, is classed as a hard wood (all trees that shed their leaves in the fall are hard woods). After some experimentation and the building of one gas job with pine, it was decided that pine was satisfactory; in fact many people prefer it to balsa. Construction time was about the same as with balsa, although it was a little more difficult to work with until we learned the different tricks. For instance, on the first attempt we used Weldwood in preference to model airplane cement, thinking the latter would not do. However, when it dried it was so tough it could not be cut with a razor blade. We then had recourse to casein glue, which while satisfactory in other ways, took too long to dry. As a last-ditch resort, model airplane cement was tried but it did not work very well until a fillet of cement was added (much the same procedure every model builder uses for square fuselages). This did the trick; the cement held so well that the wood broke before the cement. Wood in sizes up to 1/16" can easily be cut with a single-edged razor blade. The ribs were cut around a tin can template in this manner. Curved parts were eliminated wherever possible because pine splits very easily. But wherever they were used, they were glued together in straight sections and then cut to shape. Two tools that proved priceless in making this model were a Syncro Jr. saw and a variety of sandpaper blocks bearing rough, medium and smooth sandpaper. Remember, the only difference between the beginner and the expert is that the expert, uses sandpaper. As for the weight, pine when properly used will cause the ship to weigh no more than the old type of balsa ship, while possessing the advantage of great strength. The sizes were slightly smaller than those usually used. They could not be cut in half even though pine weighs almost twice as much as the hardest balsa – 16 pounds to 30 pounds per cubic foot. Despite the fact that pine was used, with bamboo paper for covering, the ship, complete with dethermalizer, is only half an ounce over the weight specified in the latest A. M. A. contest rules. The cross section was kept to a minimum and no balsa was used except for the cowling. Wire was used for the landing gear (which was made from ordinary clothesline) and hook up only. The rudder brake type really works wonderfully, slowing up the glide to a mush. It also acts as a wind vane, keeping the model headed into the wind at all times, thereby bringing the model toward the starting point. At first there was much debate as to the advisability of using this type of dethermalizer, but after witnessing the first flight, all the fellows decided to install them on their own ships. Try it and see whether you don't like it better than the one you are now using. Such were my experiences in building my first white pine gas model. Sincere thanks must be given to Frank Zaic who very generously gave his time and many valuable suggestions. FUSELAGE: The crutch is constructed first, and the entire top part of the fuselage, including the wing mount and rudder, is built before removing front the work board. When the cement is dry, the crutch is removed and the bottom half built. The landing gear is then bent and cemented in place. The inside of the cowling is carved and cemented on and when dry, the outside is shaped. Sand thoroughly with rough and smooth sandpaper. The dowels for the wing and stabilizer are then added and the completed fuselage laid aside. STABILIZER: To save yourself a lot of work when constructing the horizontal tail, use pre-tapered trailing edge stock. All the ribs are made alike and then cut to the required length. The taper for the ribs is cut from the rear, using the leading edge for a basic point. The ribs are then glued in position and the spars, tips and gussets added. WING: The wing design was selected because of its simplicity and efficiency. The straight taper is very easy to build and eliminates the necessity of long curves on the tip for a nice-looking wing. The ribs are all cut to the same length and then cut to the proper length for their respective positions. The following method is used to taper the ribs by means of the tin template. The ribs are tapered by placing the bottom of the template on the lower surface of the airfoil in a line with the leading edge and the trailing edge thickness. The wood projecting below this should be sliced may with a razor blade. Do not expect to cut this wood with one sweep of the blade. After the second or third try, depending on the pressure used, the wood will part and presto! -- a perfectly tapered rib. The ribs and spars are then added and cemented securely in place. The tips and gussets are now cemented in place and allowed to dry. The leading edge is first shaped with a razor blade and then, along with the rest of the wing, sanded to a smooth shape, both in outline and contour. MISCELLANEOUS AND COVERING: Add the wiring and shellack well the inside of the cowling. Mount any Class B motor, being sure to drill the mounting holes slightly oversize so that the thrust of the motor can he adjusted to any direction. The entire model is then sanded to a very smooth finish to avoid ridges under the covering. The original was covered entirely (with the exception of the wing mount) with a light grade of white bamboo paper. White Silkspan or silk may be used, for the wing mount -- just be sure to wet the material first so that it may he pulled into a well-faired shape. The model should be given three thin coats of clear dope and then trimmed with two thin coats of red. The striping tape is then removed and one more coat of clear added. This provides a high gloss as well as making it a tight moisture-proof job. RIGGING AND FLYING: The effect of the wing's being out of line with the tail or vice versa, is really amazing. The findings were that the model could he made to circle entirely independent of the rudder and thrust by merely inclining the stabilizer out of line. This is important as it will fly against thrust, torque and rudder if the stabilizer is merely tilted out of line. This makes the rigging job very important. The motor is set to the right exactly 1/4", using a 12" prop. A stick is fastened to the rudder -- mark this with the prop blade horizontal. Swing your prop blade 180 degrees and move the stick to the other side. Loosen the motor and twist until this setting is achieved. This is essential for it will allow the builder to get the utmost from his ship by allowing it to fly in a nice right circle under power and then roll out on top like a hand launched glider into a left glide, actually gaining altitude on the pull-out instead of losing it as most ships do. The actual testing is a ritual which should done in a slow and easy manner. The ship is tested for the glide by running with it until you feel it start to lift from your hand, whereupon you should give it slight shove – not up -- but at it point about sixty feet from you on the ground. The ship should glide well in a nice left circle about 200 feet in diameter; adjust the tab until you get this circle. If necessary, vary the incidence to obtain a nice long flat glide. When this glide is obtained, the model is ready for her maiden flight. Start up the motor and when it turns up at about 1/4, throttle her with the same procedure used in gliding. The ship should climb slightly and to the right. This circle should be about 125 to 150 feet in diameter. If your ship shows a tendency to do this, she is really right, so slowly add power until the maximum is reached, adjusting the rudder tab until the old crate is really ticking. A Forster 29 and a Comet 35 have both been used for motive power and the ship seems quite capable of handling more power. So far, the highest flights that have been turned in were over three minutes on 14-second motor run. Piney has just won fourth place in the West Virginia State Meet with only two official flights. Scanned From June,1943 Air trails
|