Infinite variations on a single theme
is provided by
this basic wing design
by CPL. PAUL PLECAN
|
For sheer
beauty, this design surpasses most of its competitors -- and it performs,
too! |
|
Infinite variations on a single theme
is provided by
this basic wing design
by CPL. PAUL PLECAN
|
For sheer
beauty, this design surpasses most of its competitors -- and it performs,
too! |
|
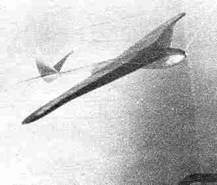
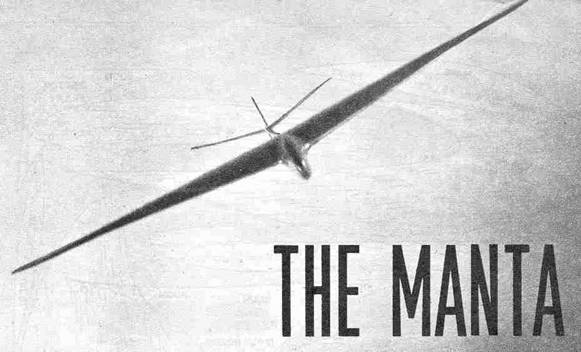
THE Manta is that "different" design you've been looking for.
Utilizing a unique wing design, the Manta
holds promise of development in several directions. One possibility could be a
sleek gas model or control line racer featuring a "submerged" engine
installation for low drag. This could be accomplished by mounting the engine on
its side, neatly enclosed in the thick center section of the Manta wing.
A catapult glider would be a novel
experiment since the inherent strength of the Manta wing would enable safe, high speed launchings to be made. As
it is, the Manta is a fine soaring
glider despite its low aspect ratio as compared to existing types.
The author makes no claims of originality
in the use of this type planform. It was developed by David R. Davis, who will
be remembered as the original backer of Donald Douglas in the formation of the
Davis-Douglas company 'way back in 1924. After the partnership was dissolved,
Davis continued his interest in aviation, one important outcome of which was
the development of the "Davis wing," the well known section used on
the famous Consolidated B-24 Liberator bomber as well as several other
Consolidated models.
The Manta planform was created by Davis for a single seat pursuit plane
he projected for the Army Air Corps back in the 'thirties.
The plane had a "buried"
Allison engine and tests on models showed great promise. However, it was not
built and the project was abandoned, leaving only the unique planform as the
result.
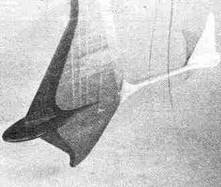
From an aerodynamic point of view,
this planform has several advantages. We are all familiar with "wing tip
stall" in which airflow about the wing tips causes a stall a short time
before this phenomenon occurs over the wing as a whole. When the tips stall,
lift is lost over that region, adversely affecting the entire lifting ability
of the wing. With the Davis Manta
type tips, stalling of the tips results in considerably less loss of lift
because the area of the stall region is much smaller than on conventional wing
planforms with "straight" leading edges. In addition, tip vortices
are cut down due to the smaller areas and a general improvement of aerodynamic
efficiency of the wing is brought about.
Frankly, we don't know whether the
use of these tips on our Manta glider
resulted in any aerodynamic improvement or not but there is one thing we are certain of: it sure gives a slick
appearance to the model and maybe that's the most important thing after all!
To begin actual construction, draw up
a sheet of 1/2" squares about 18" square and copy the full size
outlines from the plans. For a more exact duplication of the ribs, 1/4"
squares should be used but we suspect you'll photostat plans up to full size.
Next, splice up some 1/8" sheets to obtain 45" lengths for wing
spars. Save the soft 1/8" sheet for the tail surfaces -- you'll have to
butt-join the sheets to obtain the necessary width here.
The wing layout should be marked off
on a long sheet of wrapping paper and the spars pinned in place. The ribs can
be slipped in place now, working from the center of the wing toward the tips.
Be sure to bevel the trailing edges as per crossection on the plans before
cementing it in place, as it will be harder to shape it later. Very soft stock
should be employed for the tip sections to keep their weight down. Once the
necessary sheet balsa has been cemented in place, the wing can be sandpapered
and covered with silkspan of gas model weight. Lighter paper can be used but
will not absorb as much punishment.
The pod and tail-boom are next, the
pod being carved from a 1-1/2" x 4" x 14-1/2" medium balsa
block. Use the full sized pod outline to obtain the correct shape. The boom
construction should be almost self-explanatory. Just remember that the
relation between wing and tail incidences should be zero-zero and that an extra
strong joint is desired where the boom connects with the wing. The bristol
board fillets serve a dual purpose, improving streamlining and adding strength
(enhances appearance, too!). A plastic wood fillet will also help blend the pod
into the wing.
Now all that remains is to cut the
tail surfaces to outline, cutting and sanding their leading and trailing edges
to shape, Some may not desire a dihedralled stabilizer but it helps keep the
tips off the ground and avoids breakage to some extent, so it is worthwhile.
The tail surfaces should be covered with tissue of silkspan for greater
strength and smoothness, as should all other exposed wood portions.
Adjusting is done in the usual
manner. Your Manta will most probably
be tailheavy to start with, so the addition of clay to the pod and test glides
over tall grass are in order. When the glide is fairly satisfactory, start
working on a rudder warp so you can obtain a circle to the left in the glide.
The original Manta showed good
duration when hand launched in a manner similar to the procedure used for
gliders (banked to the right in launching and with the usual "S"
recovery and subsequent circling to the left).
Since the original Manta was built during a furlough, the
author would like to hear from others who have more time to devote to flying,
adjusting and further modifications of the design, especially gas powered
adaptations.
VICTORY
Scanned From August 1945
Model Airplane News
![]()
![]()