REAL indoor flying scale models are
rare birds. The scale model usually palmed off as an indoor model is heavy
enough to fly outdoors in a stiff gale.
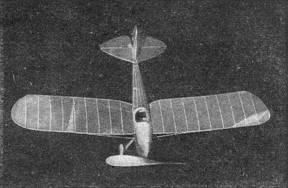
The Heath Midwing makes a
particularly good indoor scale model as it is very simple in design and
construction. It has no fancy doodads, such as a more intricate airplane would
have, and which, when left off, would make it look incomplete. Yet, when built,
it looks very much like a real airplane.
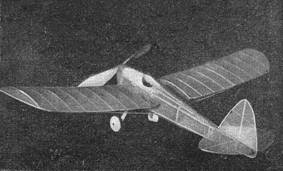
Our model has a tissue-covered
fuselage and microfilm-covered surfaces. The film, however, is not the
ordinary kind, but is of a solid color. How to make it will be described later.
FUSELAGE
Make a full-size drawing of the
fuselage sides and build them up of 1/16" square balsa and cement the bulkheads
in place. After the cement has dried, cut away enough of bulkheads 1, 2, and 3,
and the cross braces, so that the rubber can get freely from the propeller to
the rear hook.
Carve the nose block out of very
light balsa, leaving a thin shell approximately 1/6 " all around. The
plug, which is an aid to winding and changing the rubber, should be cut out
next. After the nose block is finished, cement it to the fuselage framework and
then cement the three upper and two lower 1/20" square stringers in place.
Draw the cockpit section full size, make one out of heavy white paper, and
cement it in place. Make the rear hook as shown in the drawing, and cement it
also in place. Now cover the fuselage with superfine tissue by coating the
longerons and cross braces with banana oil or microfilm solution, and laying
the tissue over the wet surface. Make sure that there are no wrinkles in the
tissue, and then trim the excess off. Spray the tissue with water to tighten
it.
The main landing-gear struts are made
by streamlining 1/16" balsa sheet, 3/16" wide and 1-7/8" long.
The auxiliary struts are 1/32" square strips of bamboo. Cement the wire
axles in place, slip the streamlined wheels made of sheet balsa 1/4" thick
and 1-1/8" in diameter, on them, and put a dot of cement on the ends of
the axles to prevent the wheels from coming off. The fuselage is finished by
cementing the bamboo tail skid in place.
WING
The wing is single surfaced and of
light construction. On the real plane it is braced with "N" struts,
but on the original model only two struts were used. The wing, as mentioned
above, is covered with a semi-opaque-colored microfilm.
In constructing this model it is
first necessary to make a template of the ribs from stiff cardboard. Cut out
the twenty ribs by the usual procedure from 1/32" sheet balsa by slicing
along the edge of the template, and then sliding the template down 1/32",
but parallel to the first cut, and slicing again. The spars are 1/20" square
and are pinned to the full-size drawing of the wing. The tips are made by
bending 1/32" square strips of soft balsa around the cardboard template,
and should be cemented to the spars. Insert and cement the ribs, making sure to
cut a third of any excess length from the front and two thirds from the rear.
The microfilm is made by mixing well a half ounce of good colored dope and a
half ounce of microfilm solution and pouring it on the water in the usual
manner. Cover the two halves of
the wing and cement them to the fuselage in the proper place as shown on
drawing. Make struts of 1/20" square balsa and cement them in the places
indicated on the drawing so that there is 1-1/2" dihedral in the wing
under each tip. This finishes the wing.
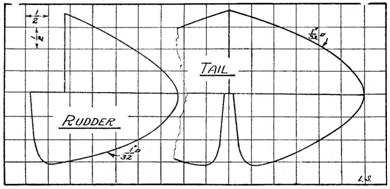
RUDDER AND TAIL
Make a full-size drawing of the tail
and rudder, and make templates of them from stiff cardboard. Bend strips of
1/32" square balsa around the templates and then pin the outlines to the
full-size drawing. Insert the auxiliary spars, cover them with microfilm, and
cement first the tail and then the rudder in place on the fuselage.
PROPELLER
The propeller is carved from a very
light block 3/4 x 1 x 7" in the usual manner. That is, first draw the
diagonals on the broad faces and remove the wood to them (allowing for a hub)
with a sharp knife. Smooth the edges and then fashion the concave sides of the
blades, using a knife at first. Progress to a razor blade and then through the
various degrees of sandpaper until the concave sides are completely finished.
The convex side should be carved with the razor till the blades are 1/16"
thick at the tip and 3/32" thick at the hub. Then use varying degrees of
sandpaper till the hub is 1/16" thick and the tips 1/32" thick. Make
a template of the blade shape of paper and cut the blades to fit. Trim and
smooth the edges and insert the shaft, first through the nose plug (and after
slipping three washers on the shaft), then through the propeller and cement it
in place. Cement one of the washers to the nose plug and one to the propeller,
making sure that no cement gets on the surfaces exposed to the rubbing.
FLYING AND ADJUSTING
Cut out the rear section of tissue
from one of the sides of the fuselage and force a loop of 1/8" flat brown
rubber through the fuselage. Connect it to the propeller shaft and put the nose
plug back in position. Glide the model. It should glide well if you have the
nose block of the proper thickness and the wing and tail set correctly. Any
necessary adjustments can be made by moving the elevators. If the model
stalls
or dives badly you will have to weight the nose or tail
accordingly. After a good glide is obtained, wind the model a few turns and
launch it. It should fly in approximately forty-foot-diameter circles. If it
does not, bend the rudder. The original model, which weighed two ounces, turned
in several flights of over two and a half minutes and appeared to be
overpowered. With 7/64" rubber the model would have probably flown nearly
four minutes, but an unfortunate argument with a large glider (in which the
glider won) ended its career.