|
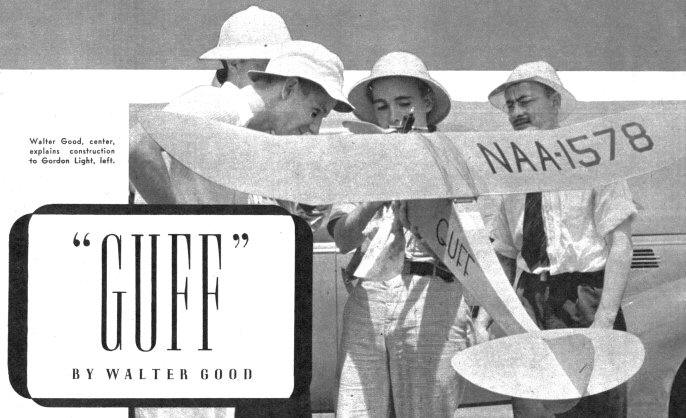
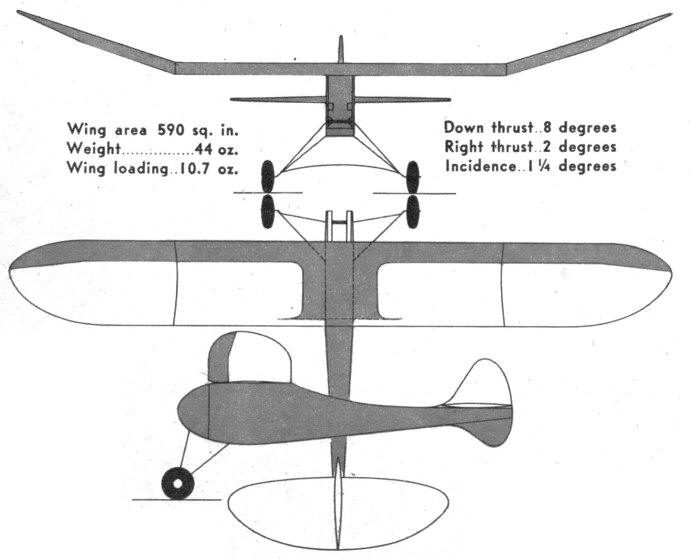
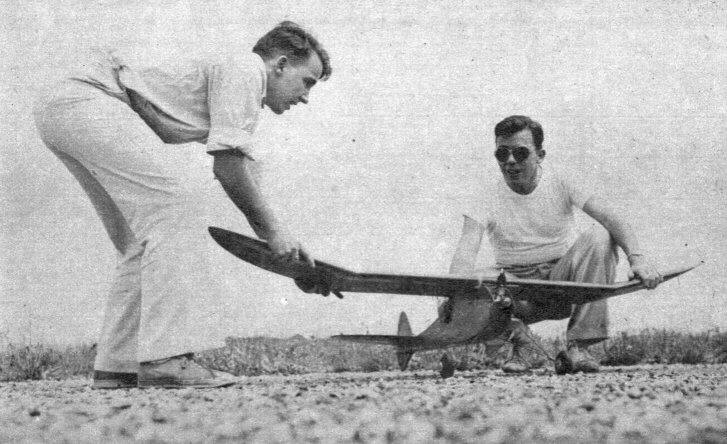
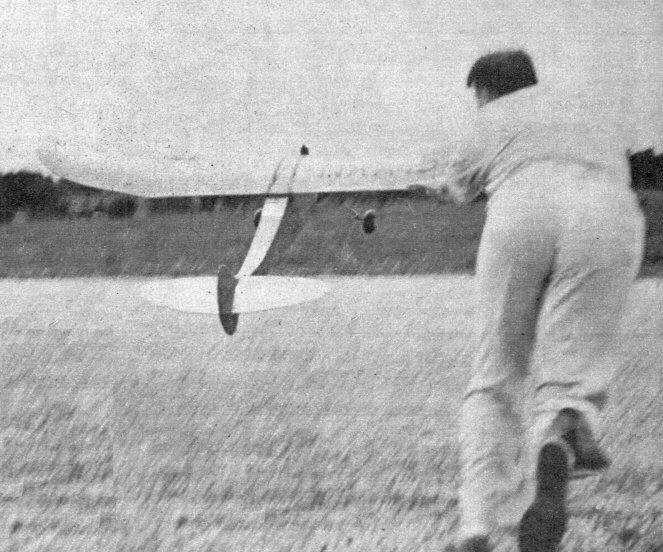
An easy-to-build record-breaking gas job that won seven contests, including the Junior Aviator Air Races, and placed in eight others. WE first heard about Guff after Walter Good flew it to first place in the 1938 Scripps-Howard Junior Aviator National Air Races. And we have been hearing about it ever since. For instance, Pete Dillon, winner of the duPont Trophy for weight lifting, told us that in his neck of the woods there was one gas job that could give the rampaging Zippers a run for their money. After seeing Guff perform at the Nationals, we were inclined to agree with him. Guff is a standout model. Its construction is a beginner's delight, for one of Good's chief aims was structural simplicity. The fuselage is rectangular and is covered with sheet balsa. The nose and motor mounting are among the simplest we've yet seen. . Guff's second flight at the Akron Junior Air Races in 1938 was 24 minutes, 4.2 seconds, a national record in the Open Class for 30-second motor run. The first flight was 1 hour, 15 minutes from Akron to Canton. Ohio, 23 miles. However the motor run was 31.5 seconds, thus discarding the flight. Guff is characterized by an almost straight-up climb and a flat glide, with soaring capabilities. It incorporates an unusual amount of down thrust (8 degrees) combined with a high-lift wing and short fuselage. Its type of climb causes it to gain as much altitude in a twenty-five-mile wind and rain as in calm weather. Good cites authentic technical reports that show prop tests in wind tunnels with as much as 10 degrees yaw often result in increased efficiency ! The reason that off-set thrust in real planes is not commonly practiced is that the induced vibration resulting from the uneven flow of air might cause cracks to form or the blades to snap off. The original Guff (two years old) has made well over 500 flights and is still winning contests. We now turn you over to the author, who will tell you how to build a ship just like it.-The Editor.
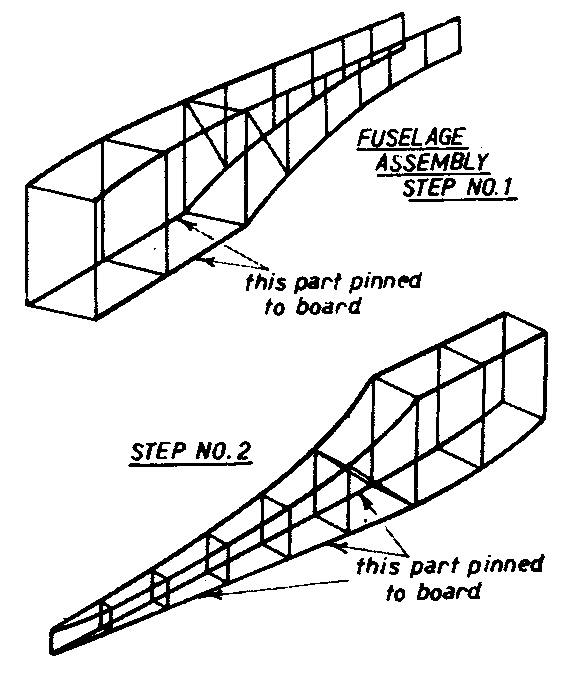
FUSELAGE Enlarge side plan of fuselage four times to full size. Select firm, straight 1/4" square balsa for top and bottom longerons. Hold bottom longeron in place with pins, noting that it is straight from Section 3 to the tail. The top longeron is in two pieces, a straight one from Section 1 to Section 3, and a curved one from there on. Wet with water all curved balsa after it is in place except at the joints. This will allow gluing to take place even though some parts of the balsa are wet. Cut and glue in place all cross braces and diagonals. Build another side on top of the first one, thus assuring their being identical. Before removing pins, apply glue at least twice more to all of the joints. (This model, well built, should last several years. The original model was lost for many months yet, after being found, completed another successful season.) When thoroughly dry, remove sides from drawing and separate them with the help of a razor blade. The body is now assembled in two steps. Turn the sides upside down as shown in the small detail on the plans and glue in the six cross braces in Sections A, B, and C. When dry, turn back right-side-up and pin the flat portion of body, from Section C to tail to the drawing board. Insert the remaining cross braces and give all joints a final coat of glue. Make tail-wing cradle from 1/4" soft sheet.
The motor mounts are maple or any hardwood 1/2 x 3/4". The front ends are angled down about 8° for down thrust. Glue motor mounts to fuselage sides, then fill Sections A and B with 1/4" hard sheet balsa as shown. Medium 1/4" sheet is used for the nose sides. Run the grain vertical. This strengthens the nose considerably. Carve to a smooth shape and sand. Paint glue with a brush over the motor mounts, front of Bulkhead A, and the nose sides. Use at least two coats of glue, knitting the nose together, making it almost indestructible. Install the ignition system, using stranded wire. The coil is held in place with a fiber strap screwed to the front bulkhead. The condenser is mounted on a piece of balsa which is below the coil. Hook up the wires according to the drawing with the two motor wires threading through holes beneath each motor mount. Solder all connections well. The ground wire is connected to one of the motor screws. The flight timer is not put in place until after the body is finished. The battery box is for medium-size batteries and uses 1/8" hardwood for the ends and plenty of glue. Bend the landing gear from 3/32" diameter steel wire. Solder the arched piece to the front one. To do this, clean well, bind together with tinned wire, use flux and plenty of heat. Bind the struts to 1/4" square very hard balsa with fish line or linen thread. After slightly notching bottom longerons for wire, glue landing gear to fuselage so that it is flush with the bottom. Now gusset each gear base with six small gussets of 1/4" stock and cover with glue. The rear strut is fastened to the front one with several small rubber bands so that severe landings will cause the front strut to slide back on the other, thus absorbing the shock. The body is now ready for the sheet balsa covering. Sand the whole framework lightly, removing all bumps and irregularities. Using firm 1/32" sheet, cover sides and bottom from Station A to C with the grain running crosswise of the body. If the sheet is brought tip to within a quarter inch of Station C, a smoother joint will be made when the lengthwise covering is done. The top of the cabin under the wing is not covered. Cover now with the 1/32" sheet running lengthwise. On the sides use a sheet 36 x 3" and cover from the tip of the nose to tail, doing about two sections at a time. A brush for the glue and plenty of pins will speed up the process. When gluing the 1/32" sheet edge to edge, place glue on both edges and press together, wiping away excess cement. A short sheet will finish each side. Trim when dry and cover top and bottom. Sand the whole body and apply two coats of clear dope, sanding lightly for smoothness after each one. Install wing fastener dowels with plenty of cement. Soldering the 3-1/2" streamline Voit airwheels in place finishes the body. TAIL WING The double ellipse tail has an outline of medium-soft 3/16" sheet balsa. Cut out tips and outline and glue together on a flat surface. This establishes its flatness. The tip grain runs parallel to the spar which, is hard 1/8" sheet tapering from 3/4" at the center to 3/16" at the tip. Install spar and notch leading and trailing edges for ribs. The two center ribs are of 1/8" soft sheet made according to rib pattern shown. The other ribs are medium 1/16" sheet. Instead of cutting ribs to shape beforehand, oversized pieces are glued in place and are carved to a streamline shape after the glue is dry. Bevel leading and trailing edges and skim tip to a knifelike taper. Sand thoroughly and cover top of center section between the two 1/8 " ribs with 1/32" sheet, grain parallel to spar. Cover tail with four separate pieces of bamboo paper, using a half-and-half mixture of cement and dope for the adhesive. Be sure to cement paper to ribs. Water-spray and weight-down while drying. Apply two coats of clear dope, sanding after each with very fine sandpaper. Weight these also while they are drying. Cut away paper from bottom of center section and glue tail wing to the cradle in the fuselage. Do not spare the cement. Tail should lie at zero degrees. RUDDER The rudder is made in the same manner as the tail wing. The spar, hard 1/8" sheet, tapers from 3/16" at top to 7/16" where it meets the wing. The spar extends through the body down into the lower rudder. The lower rib of the upper rudder should follow the contour of the tail wing. The rudder tab is held in place with two 1" lengths of copper. wire. Cover rudder with bamboo paper, water-spray, and brush on two coats of clear dope. Cut a hole in the sheet on top of the tail wing for the rudder spar and glue rudder in place as straight as possible. The under-rudder is solid and is made of two sheets of soft 1/8" stock laminated at right angles. Carve to streamline shape. Cut notch for spar. and glue in place. Force and glue metal skid into bottom of under-rudder. Two coats of clear dope will smooth it. WING The wing has tip dihedral and is built in three sections. Carefully select good hard springy 1/8" sheet for the spars, which are 1" deep. Cut the ends at exactly the angles shown to give the 5-1/2" dihedral. Too much dihedral will make the model difficult to turn. The tip taper is all in the bottom. Cut out twenty-four ribs from medium 1/16" sheet, four of 1/8" and three false ribs of 1/4". Shape trailing edge from soft 1/4 x 3/4" stock and notch it 1/8" deep for ribs. On a flat surface assemble center section ribs to the main spar and glue. Before the cement dries, push on trailing edge and cement. Omit the end 1/8" ribs at present. Cement on the 1/4" square hard leading edge. It is shaped later. Attach 1/8" medium stringers. Give all joints a good coat of glue and allow to dry thoroughly. The tip sections are made in a similar manner for the first ten inches. The 8" tip portion is made like the tail wing. Glue on the leading and trailing edges of medium 1/8" sheet and put in the oversize 1/16" sheet ribs. With a razor and straight edge, cut and try the ribs to give a straight taper. A slight undercamber is retained in the tip section. Cut notches for the 1/8" square stringers and glue in place. The sections are now ready to assemble. Care must be taken to make the tips exactly true with the center section. Pin center section to a flat board, butt tip sections against it and glue spars, leading and trailing sides of the spars. The 1/8" sheet rib is now slipped in place and the 1/8" square stringers are fastened. While the wing is still pinned on the board, put on the 1/32" firm sheet covering to leading edge and 8" center section. Glue and pin the 1/32 x 2 x 36" sheet to the leading edge and allow to dry. Then bend it over leading portion of rib and glue and pin to ribs and 1/8" square stringers. Cover top of tip section with two pieces of 1/32 x 2" sheet, one for the first ten inches, the other for the 8" tip. The center portion is covered with grain parallel to spar. When dry, remove wing from board and put sheet balsa on the bottom, making sure wing is perfectly flat at all times. Shape the leading edge with a razor and sand the whole wing in preparation for covering with bamboo paper. Cover bottom of center section, making certain that the paper follows the undercamber. First cement to sheet balsa leading edge, smoothing out all wrinkles with your fingers. Second, cement to ribs back to the spar. Last step is from spar to trailing edge. Cement paper to everything to prevent ribs from warping. Cover bottom of tips in like manner, and then the top, overlapping the paper 1/8" at the joint. Water-spray and weight while drying. Any remaining wrinkles should be water-sprayed a second time. Apply two coats of clear dope, watching for warps and weighting accordingly. Sand very lightly after each coat. Give the whole ship one coat of your favorite colored dope. The original ship is deep orange because of its good visibility against both the sky and ground. This can be made by mixing one part red with three parts orange. Fasten the flight. timer (after checking points for good contact) to a 1/4" sheet and glue in place with arm sticking through slot behind wing. Mount the motor with 8° down thrust and 2° right thrust for a starting adjustment. The original Guff uses a Brown B, but other Guffs have been powered with Dennymites, Mighty Midgets. and Cyclones with good performance. With a Brown motor use a 14" prop with an 8" pitch. Too much pitch is not desirable. Glue two wing warts, 1/8 x 1/8 x 1/8" balsa blocks, to the body behind the wing and also two to the wing itself along the bottom. Also one on the trailing edge and one about an inch from the leading edge along the side of the fuselage. These act as placement blocks, because with a long wing on a short body, the model is quite, sensitive to the twist of the wing. Fasten the wing on with a four-foot loop of 3/16" rubber and slide batteries until ship balances at the c.g. indicated in the plan. Mark position of batteries and glue in battery box hooks to bottom of ship. FLYING Hand-glide with neutral rudder and adjust wing incidence until a smooth straight glide is obtained. Use rudder tab to correct any turn. When satisfied with glide, try a power flight. With motor well retarded, run the wing tip until model is clear of the ground; timer set at 10 to 15 seconds. Watch the glide. It should be flat and fast in large left circles. A riser will tighten up the circle, keeping the model in it as long as possible. When the glide is satisfactory, work on the thrust line for the power flight. From this point on, change only the thrust line for adjustment. The climb should be straight or in a very large left circle. Slowly increase the power on successive flights and watch for a tendency to loop -- correct this with more down thrust. Too much down thrust will give a tendency to vertical bank at the top of the climb. Working carefully, full power may finally be used. This should give a straight-up climb between 80° and 90° with no bank at a rate of about 1,500 feet a minute. When the full-power adjustment is found it will be noticed that the ship will still fly well for any lower power. The straight nonbanking climb will give the same height even in a twenty-five-mile wind. So wind her up and hope for bad weather at the next contest. BILL OF MATERIALS
MISCELLANEOUS
Scanned From June, 1940
|